

Contents of the article
Description of the Redcut report processor
The Redcut report processor is a special Excel file that can process data from the report file generated by the EasyKitchen plugin. It puts them in order, distributing panels and fittings into the appropriate tabs and lists. At the same time, Redcut has the functionality that allows you to make some changes and adjustments for more accurate detailing and estimates.
The Redcut report processor is located in the "Redcut" folder in the EasyKitchen PRO library. In this article, we will look at all aspects of this file, which is extremely useful for any furniture maker.
To work correctly with the Redcut, your version of Excel must be at least 2016.
Excel Security Settings
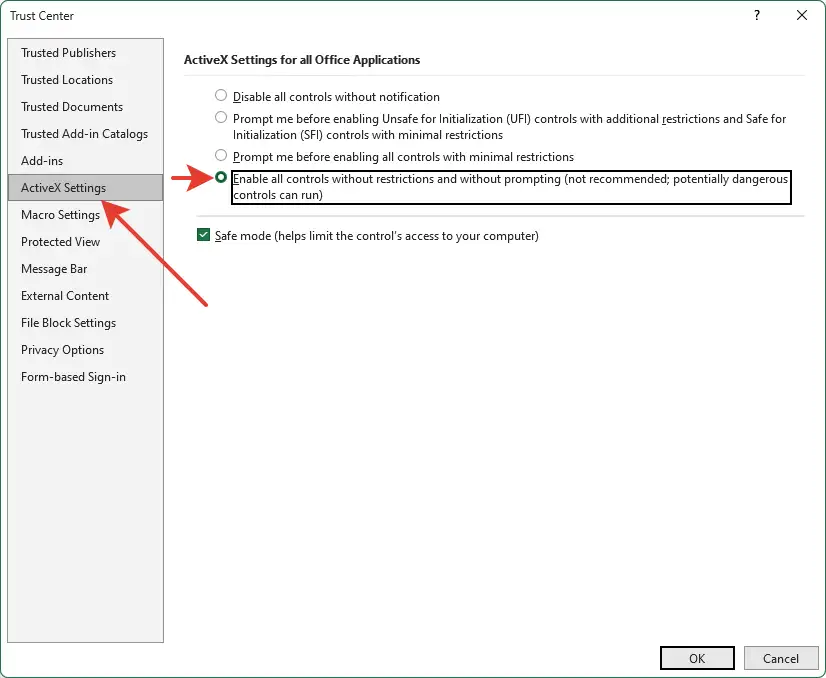
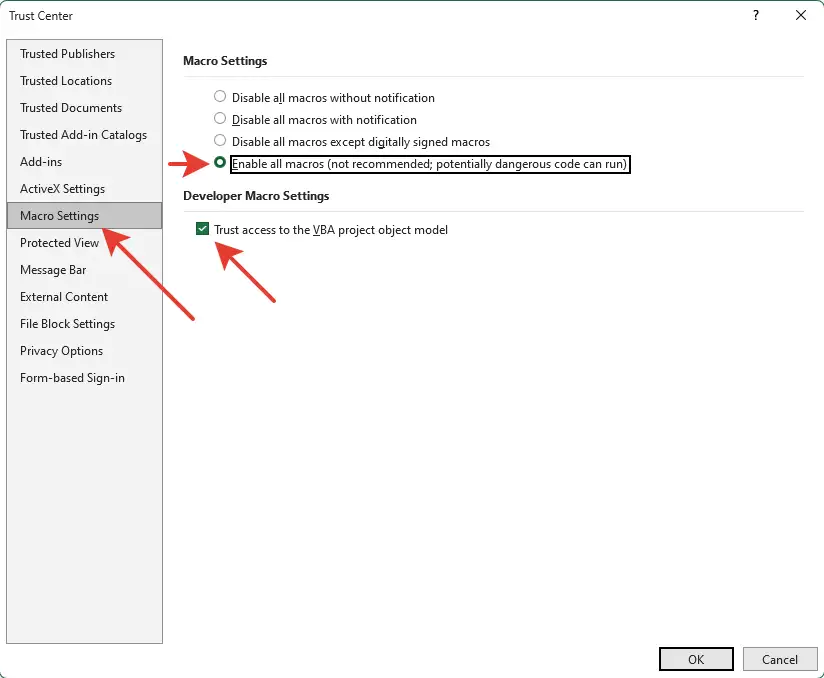
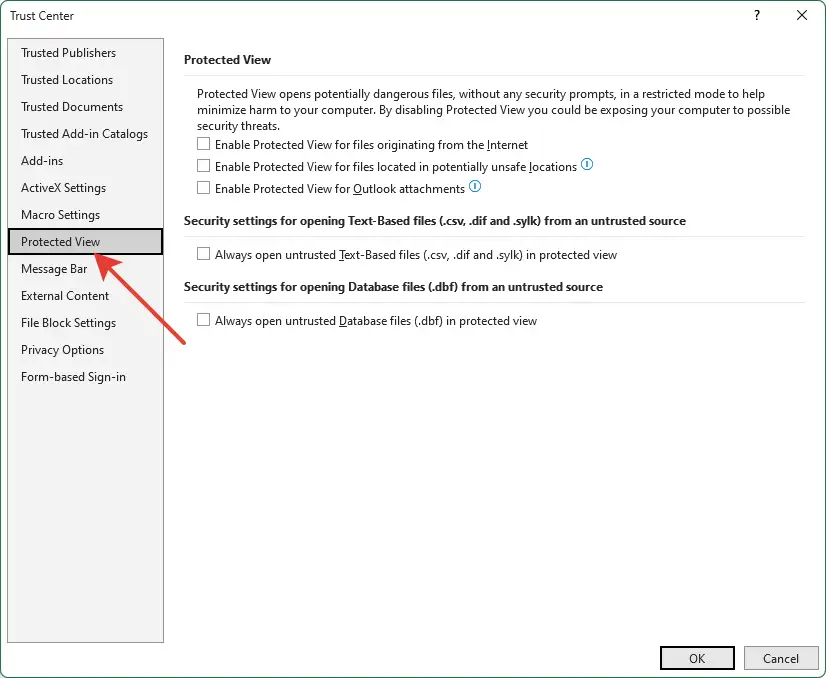
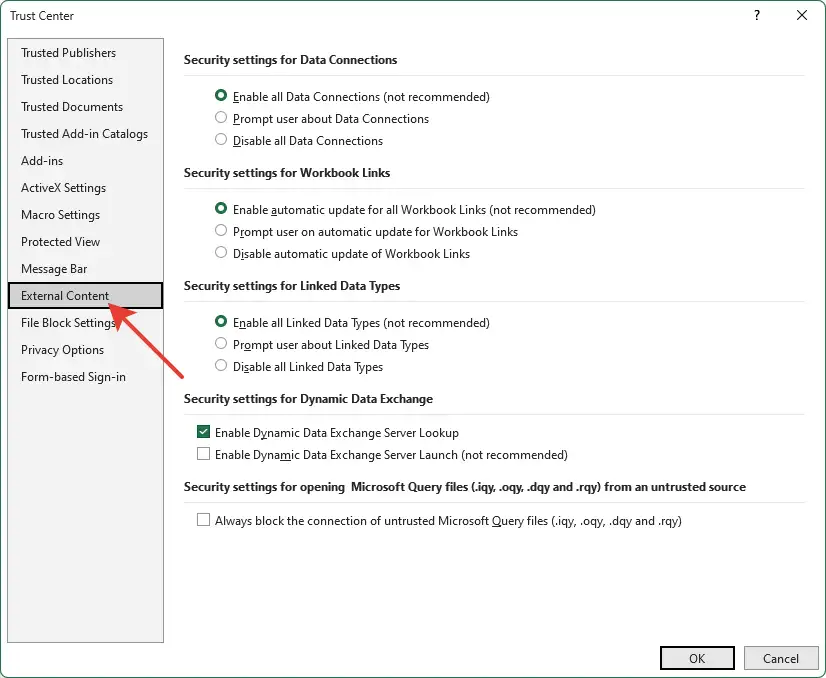
Excel perceives each new file containing macros or active elements as something that threatens security. Therefore, by default, it blocks their execution. Due to this, many Redcut functions stop working. To fix this, first go to the Excel Trust Center:
File->Options->Trust Center->Trust Center Settings
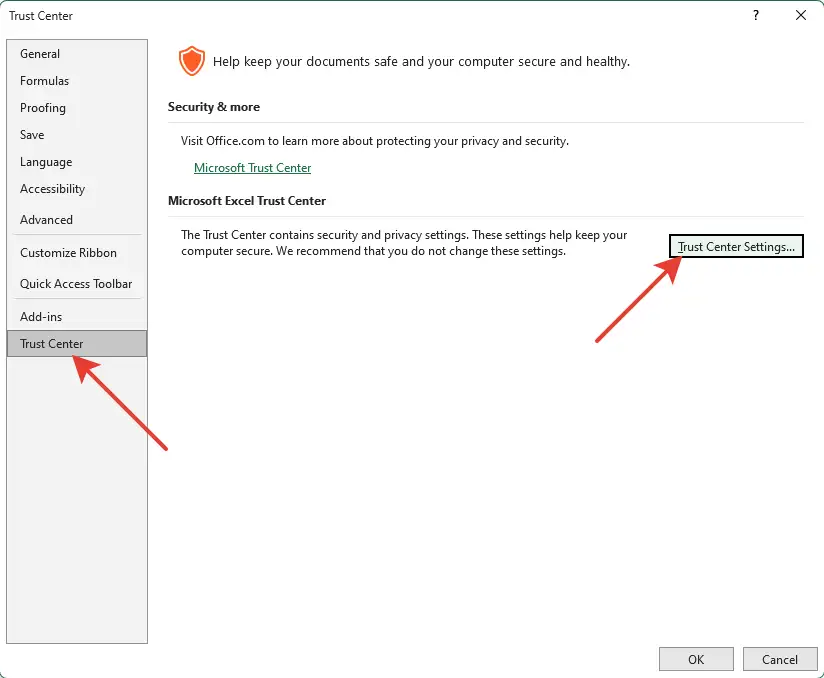
And switch all the parameters as indicated in the pictures below:
In some cases, the Redcut file itself may be blocked. To fix this, close Redcut, right-click the file, and open Properties. On the first tab, at the bottom, check the "Unblock" option. The image below shows an example:

Start page
When you launch Redcut, you will immediately get to the first tab "Start". All the main settings are collected here. This is what this tab looks like:

Let's look at each block separately. We'll divide them into three parts - top, center and bottom.
Top part
In the upper left corner there is a Redkit logo, which you can replace with your own if you wish.
Below it is a block with the client's data. Here you can specify the client's full name, date and order number, as well as the name of the file in which you can use your formula. The name will be assigned to the file when you use the "Save As" button.
A little further down is the detailing parameters block. There are only 2 items here:
- Part size precision - number of decimal places in part sizes. Zero - integer values only.
- Number of project copies - multiplies all project components by the specified number. For example, if you have 10 identical cabinets, it is enough to make a project of 1 cabinet, send it to the report and specify 10 copies.
Moving on to the top right, it lists the Redcut version first, and links to our website and this documentation article.
Below this block is the language switcher. If you plan to use Redcut in a language other than the default, be sure to skip to the "Changing the Language" section of this article. There are important steps to take after changing the language.
Below are 3 important buttons:
- Save As - saves the current file with the name specified in the "File Name" field to the specified folder. It is better to immediately train yourself to save Redcut separately for each project, so that next time you always have a clean Redcut. This is important, because if you need to edit the project in Redcut, this will erase some formulas and using such a file will lead to errors in the next calculation.
- Upload Report - Uploads a report generated in SketchUp into Redcut. The report is saved in the same folder and under the same name as your project. Once uploaded, a message will appear that the file has been uploaded. This usually takes a few seconds.
- Clear - clears the project of all loaded report data.
You can upload several report files, but one after the other. The lists will be placed one under the other. Remember about the line limits for each type of material. Exceeding these limits may result in the loss of data that does not fit into the lists.
Central part
There are 4 blocks here that are responsible for the dimensions of the sheet material and the edge parameters. You can enter your parameters in the cells colored gray. Let's consider each block separately:
- Sheet Material Size - the length and width of any sheet material that will be used in calculations. Several popular sizes are set by default. You can add your own sizes in empty cells or change existing ones. Squareness is calculated automatically.
- Tabletop sizes - as in the block with sheet material, several popular tabletop sizes and thicknesses are specified here. In the empty cells, you can specify the sizes and thicknesses of the tabletops that are used in your production or replace existing ones.
- Glass dimensions - are the same as sheet material dimensions, with the only difference being that they apply only to the "Glass" type.
- Edge parameters - here you specify the thickness of the material and the corresponding edge width. By default, popular thicknesses and edge widths are specified. You can change them or add your own.
Bottom part
Here are the settings for detailing and export to cutting programs. Let's look at each block separately:
- Pure detailing data is the data that will be taken into account in the pure detailing list. Pure detailing combines parts with the same parameters. Accordingly, the more data is used, the fewer parts will be combined. For example, there are 2 modules with different names. Each of them has a shelf with identical dimensions, edges, cuts, etc. If you do not include the module names in the pure detailing, these shelves will be combined. If you do include them, these will be different shelves by module name. Therefore, they will not be combined.
- CSV/XLS Export Constructor - this block is responsible for the format of the exported CSV or XLS file. What data will be in it, in what order and with what separator. Items with check marks are responsible for the data. If the check mark is checked, then this data will be added to the export. The numbers in the "Item No." column are responsible for the order. Here you can specify the number opposite each check mark, under which this data will be written to the export file. Split CSV is a sign that will be used to separate data in the export. Decimal separator is a sign that will separate the decimal part of the number from the whole. Split CSV and Decimal separator must be different.
- Jointing - set your jointing value on chipboard, MDF or countertop parts. It will be applied in full on the corresponding material tab.
- Edge accounting is an option that allows you to switch the edge accounting type on the selected material at once.
Change language
You can change the language used in Redcut. To do this, simply switch it on the file's start page. Almost all text used in the file will be translated into the selected language, with rare exceptions.
Excel does not allow you to dynamically change the names of some elements, such as tab names or text of active elements (buttons, checkbox names, radio buttons, etc.), so we have duplicated the names of these elements in Russian and English. You can replace these names with your own. There will be no problems.
After changing the language, it is necessary to re-switch the edge accounting and the sheet/square/rod/linear calculation modes in the estimate. These elements cannot switch to another language on their own. Otherwise, they will remain in the previous language, which can lead to errors.
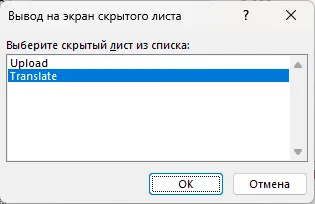
You can add your language to Redcut. To do this, you will need to translate about 120 words and phrases. To do this, first display the hidden sheet called Translate. Right-click on any tab and select "Show...". A window like this will appear, where you will need to select the sheet we need and click OK.
A previously hidden sheet will appear, containing the following table:

In the third column, change the heading to your language name and add your translation for each item in the list. Keep the order, characters, and case of letters. After that, you can switch Redcut to your language.
Editor tab
A tab where you can filter the downloaded data by one or more criteria to find the desired items and adjust them.
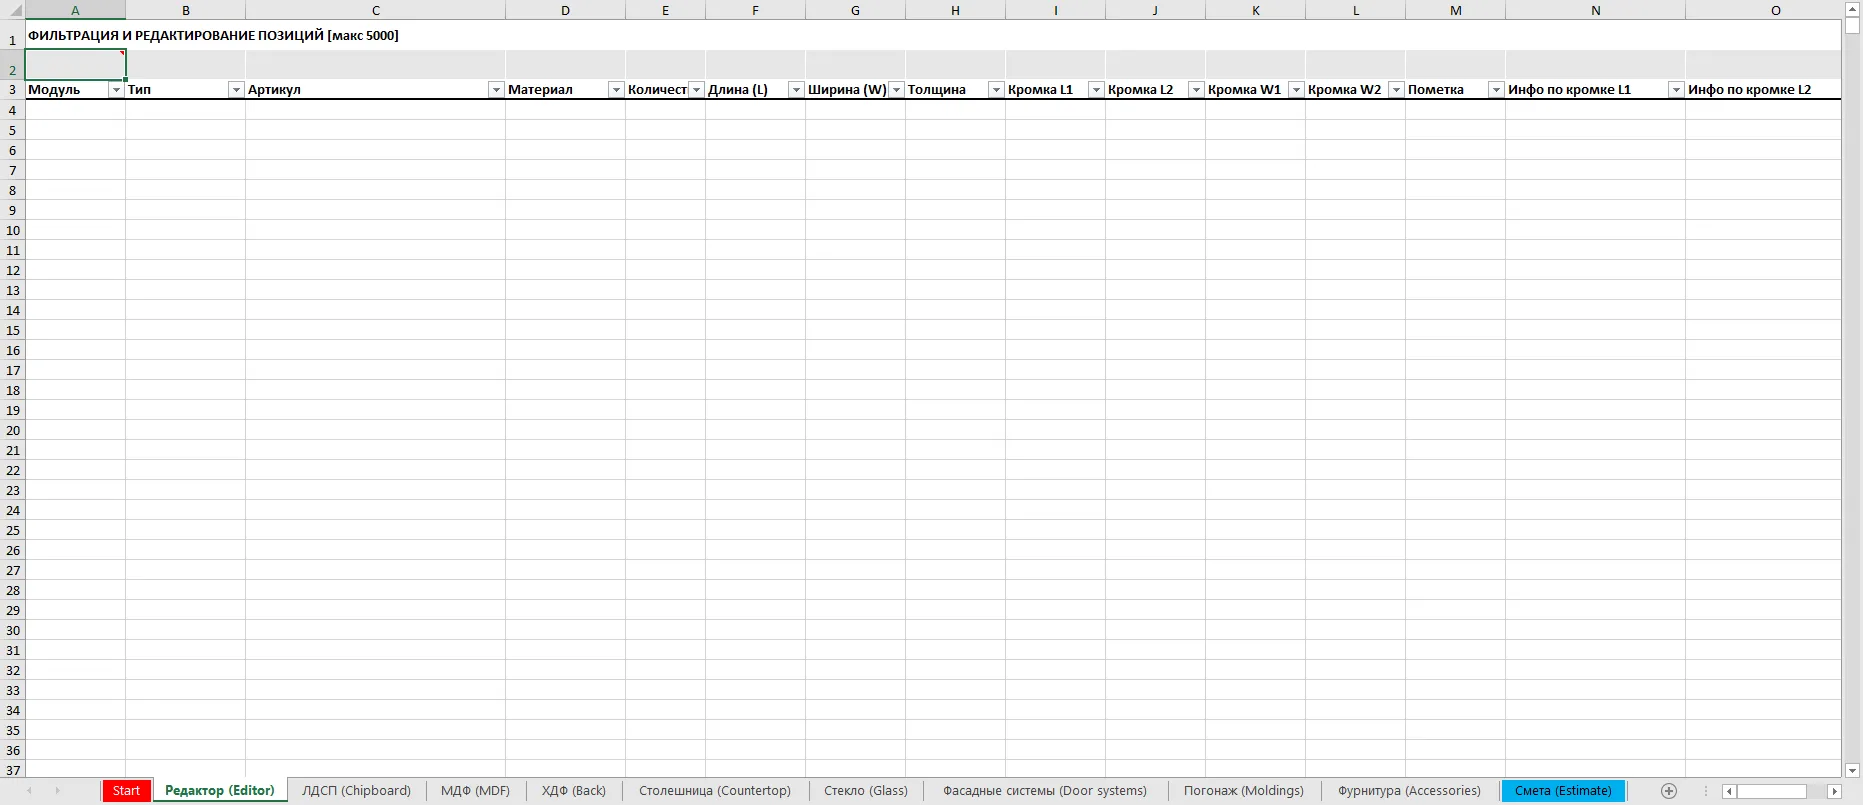
All filtering is done through cells highlighted in gray. You need to enter the search text in them. Each cell corresponds to the column in which it is located and will be searched in it. In this way, you can set several search criteria.
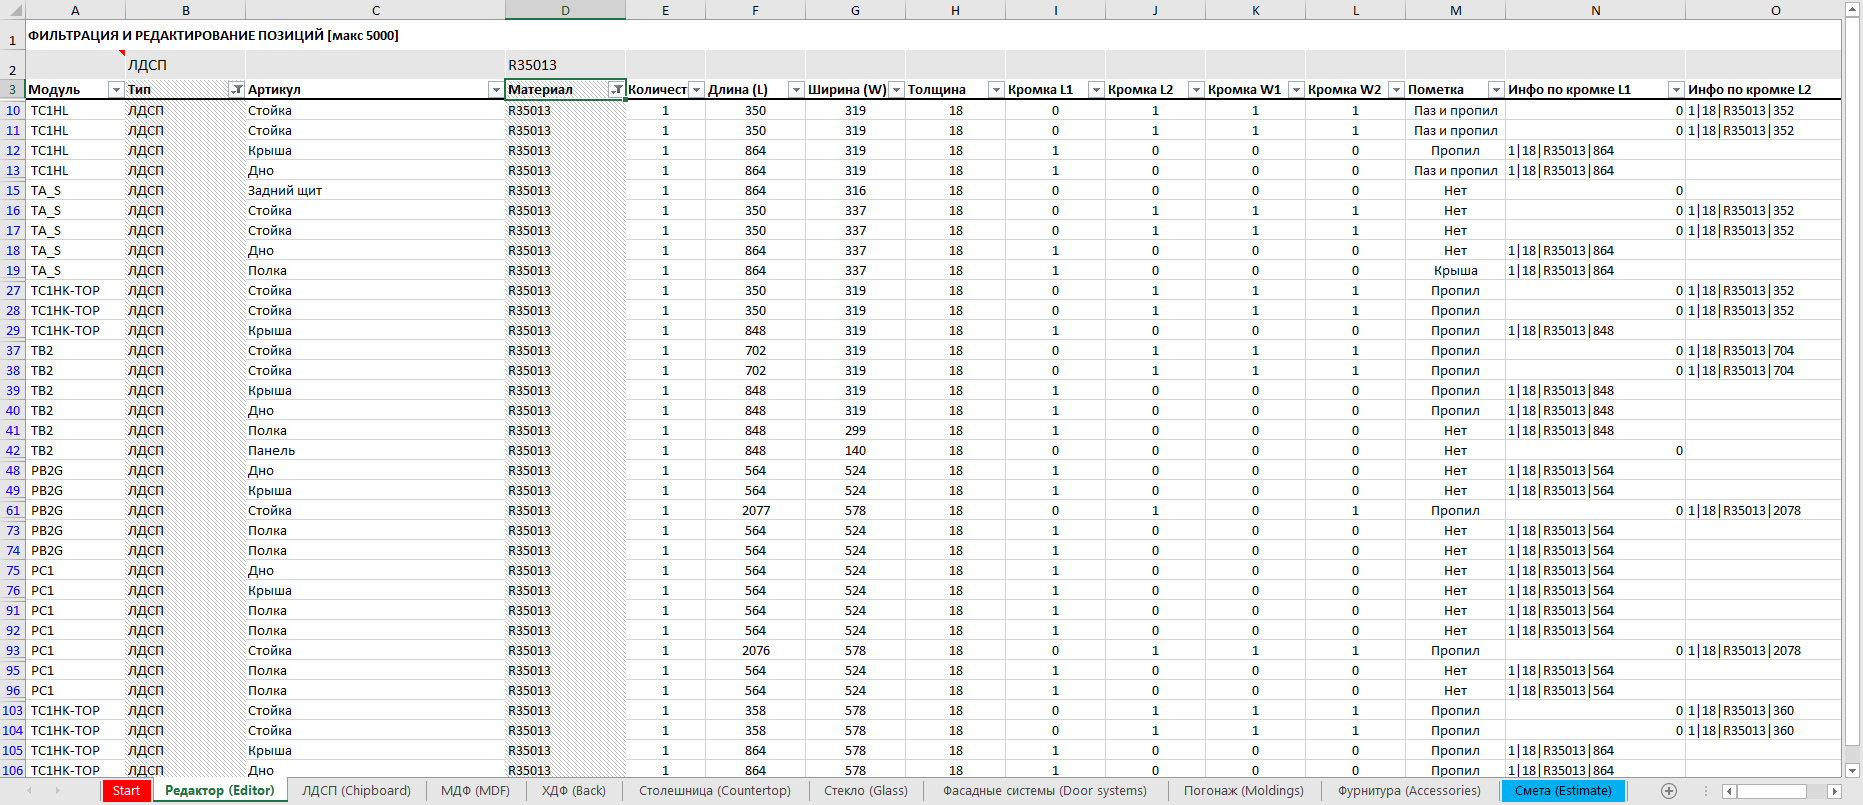
For example, you need to find all panels with the type "LDSP" painted in the texture H35013. To do this, you need to enter LDSP in the gray cell above the "Type" column, and enter H35013 in the cell above the "Material" column. After that, the program will find all possible matches at once for both criteria. Columns in which filtering is applied will be marked with gray hatching.
You can also adjust all input data here. If there was an error in the project, you can (and even should!) fix it here. To do this, simply change the value that contains the error to the one you need. After that, this value will be corrected in all subsequent Redcut tabs.
The main thing to remember is that after such an adjustment, do not use this Redcut file again. Take a new, clean file, because when editing cells, the formula in it is lost and the next list will be displayed incorrectly.
Chipboard tab
Now we move directly to the tabs with lists of materials. For greater clarity, we loaded a test report file into Redcut. This is approximately what the "LDSP" tab with loaded data will look like:
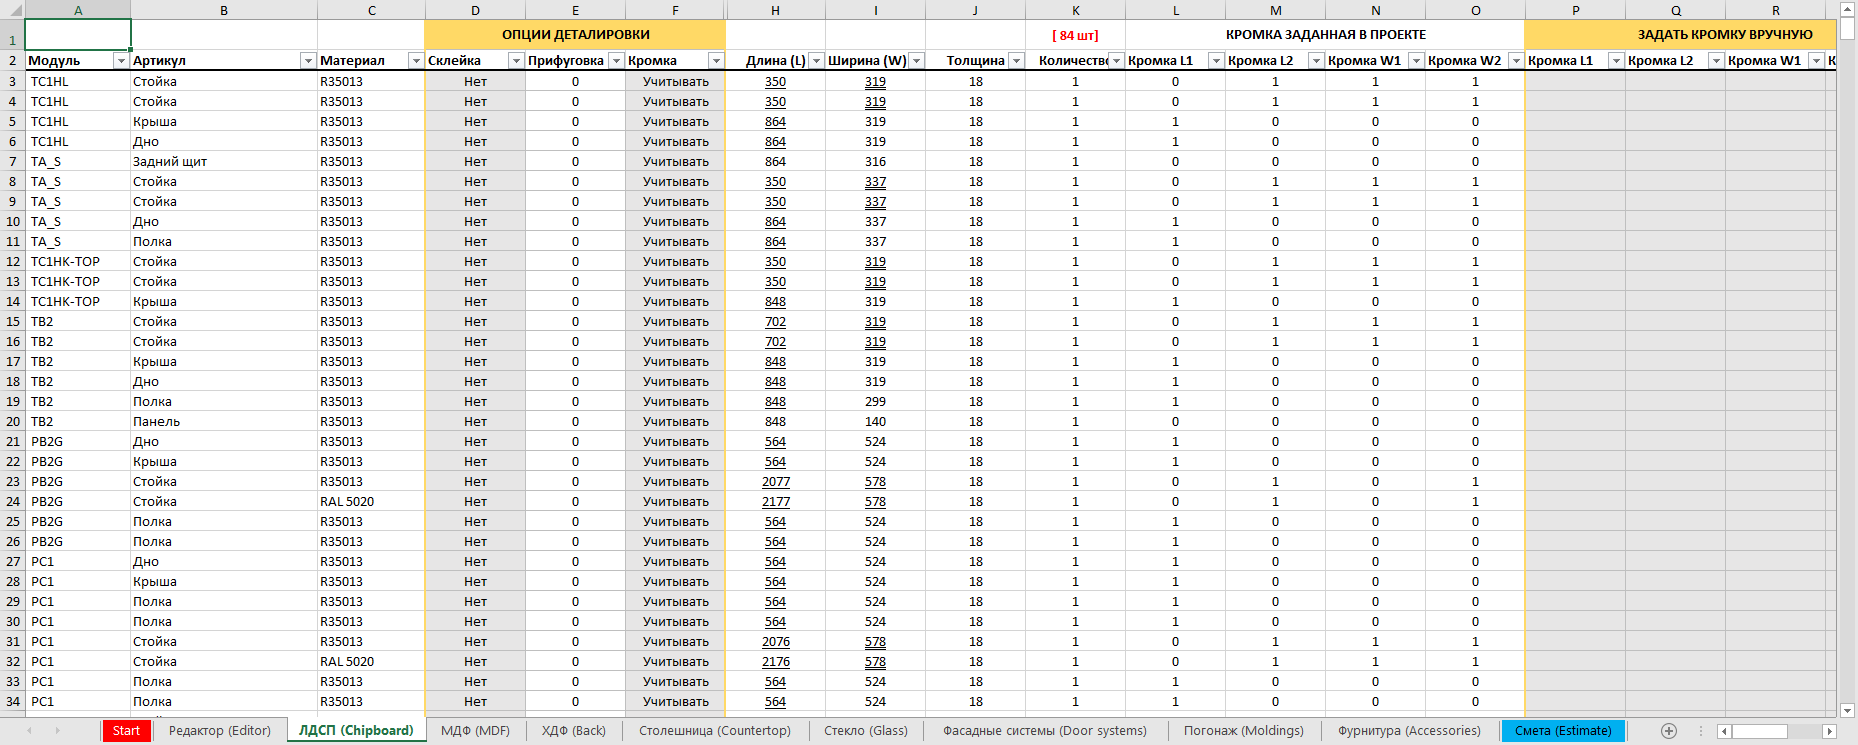
On the left side there is a complete list without combining (concatenating) all project parts that have the type "LDSP". Pay attention to the columns with the heading "Cutting options". Here you can make adjustments to the dimensions of the parts and their thickness. There are three parameters for this:
- Gluing - allows you to split a thick panel into two thin ones. This is useful if you plan to glue (twist) two panels together to achieve the desired thickness. For example, there is a panel with a thickness of 32 mm in the list. It will be glued from two panels of 16 mm thickness. Change the gluing parameter in the corresponding line from "No" to "Yes" and instead of one piece of 32 mm thickness, there will be two of 16 mm. In this case, the edge width will remain the same as intended for 32 mm thickness (i.e. 36 mm in this case).
- Jointing - allows you to take into account the jointing of parts before applying the edge. Here you just need to set the size of the layer to be removed in millimeters. The dimensions of the parts will change accordingly.
- Edge - allows you to consider or not consider the edge on the parts. If "Consider" is set, the size of the parts is reduced by the thickness of the edges on the corresponding sides. In the second case, the edge on the parts is not considered. A useful function if you use a 0.4 mm edge, where there is no particular need to change the size of the parts. You can also switch the edge consideration to "Set manually". In this mode, the entire edge specified in the project is removed from the part. Instead, the edge that you can specify in the columns to the right will be considered - the gray area called "Set edge manually". Enter your edge thickness on the desired sides of the part there. The dimensions of the part will be automatically adjusted for the new edge.
After the columns with parameters come the dimensions of the parts, their thickness, quantity, edge and square. The dimensions of the parts are underlined according to the edge. One underline - the edge is applied on one side along the given dimension. Two underlines - the edge on two parallel sides.
Redcut accepts data on 0.4 mm edge in any format. That is, in EasyKitchen you can write the edge both through a comma (0.4) and through a period (0.4). The processor will automatically change the period to a comma.
For greater information, the headings of the columns "Quantity" and "Area" indicate the total amount of data included in these columns.
Next, in the right part of the table, there are columns called "Clean cutting". Here, all the details from the left list are concatenated. Details of the same color, size, and thickness are summed up, forming a list convenient for cutting. This list is dynamic - it can change depending on the changes made in the left part of the "LDSP" tab. In particular, the unification of the details of this list depends on the settings of the "Clean detailing data" block on the Redcut start page.
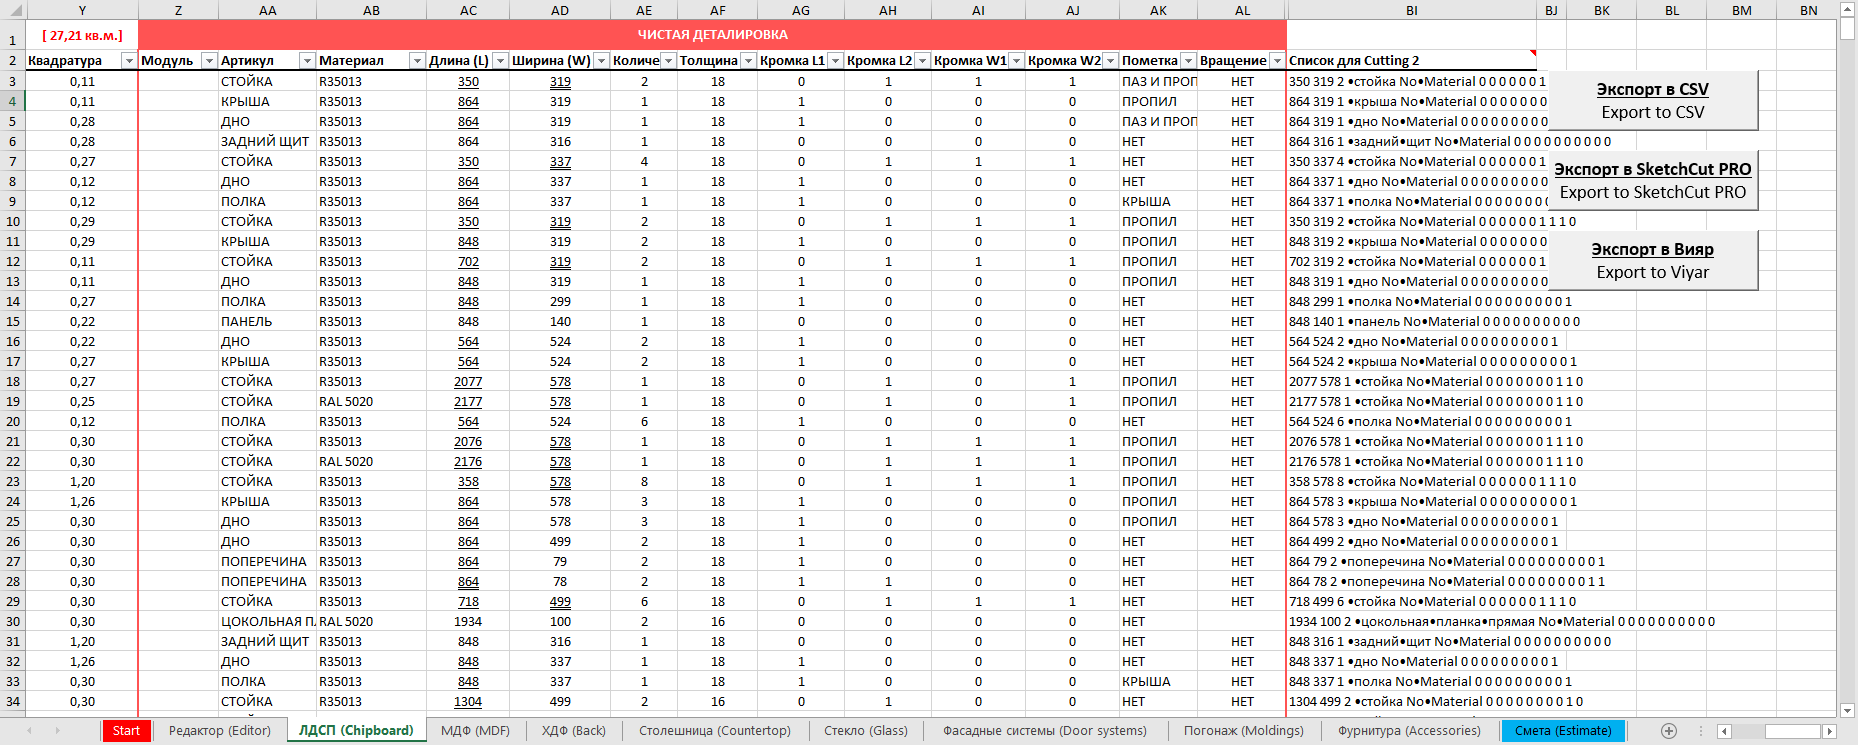
The last column in this tab forms a list for transferring the detailing to the Cutting 2 program. Copy the lines and paste them into Cutting using the Shift+F6 key combination.
At the end of the table there are 3 buttons that allow you to generate export files to various cutting programs. Each file is named by the type of material and the exact date of generation:
- Export to CSV - the button creates a CSV folder in the same folder where the Redcut file is located (if it is not already in the directory) and places a CSV file with the details from the clean list into it. The data, as well as the data sequence and separator, are specified in the "CSV/XLS Export Constructor" block on the Redcut start page.
- Export to SketchCut PRO - the button creates an XLS folder in the same folder where the Redcut file is located (if it is not already in the catalog) and places an XLS file with detailing from a clean list into it. The data, as well as the data sequence and separator, are specified in the "CSV/XLS Export Constructor" block on the Redcut start page. This file is conveniently exported to the SketchCut PRO cutter. SketchCut PRO can be purchased on the developer's website.
- Export to VIYAR - the button creates a VIYAR folder in the same folder where the Redcut file is located (if it is not already in the catalog) and places a CSV file with the detailing from the clean list into it. The data in the file is configured so that the detailing can be imported into the VIYAR system without problems. Suitable only for cutting with an edge, without fillet.
MDF tab
This tab is no different from the "LDSP" tab. All project details of the "MDF" type are included here. They are processed in the same way as LDSP.
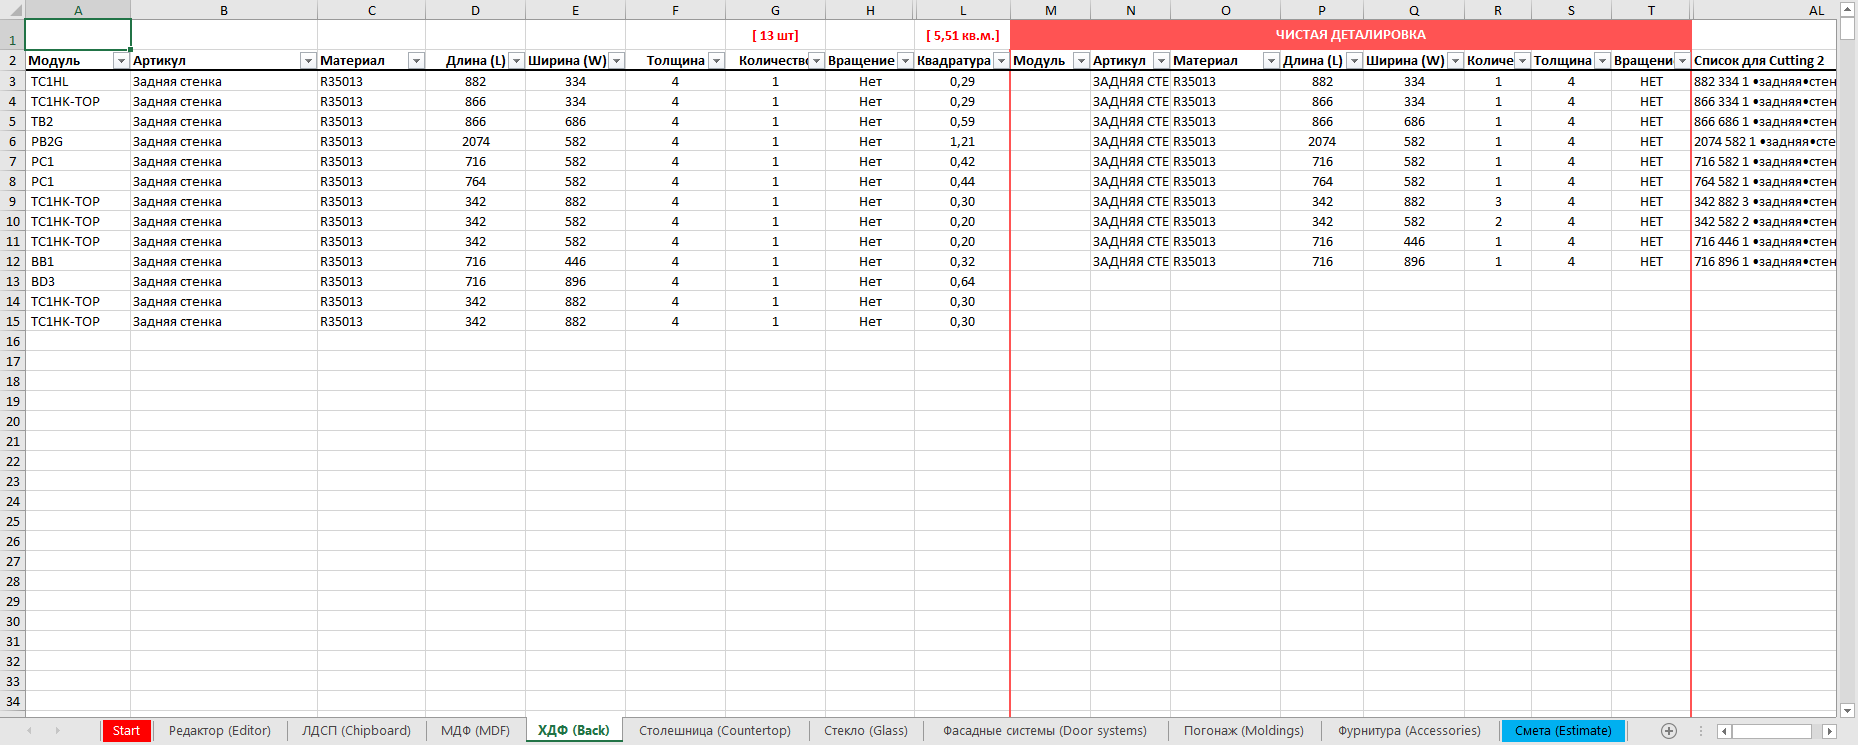
HDF tab
This tab differs from the two previous ones only in that there is no edge and all parameters related to it. All project details of the "HDF" type are included here.
Tabletop tab
All project details of the "Tabletop" type are included here. Otherwise, there are no differences from the chipboard and MDF tabs.
Facade Systems tab
This tab contains all project details of the "Facade Systems" type. The tab is intended for facades and elements that are calculated not by square footage, running lengths or sheets, but by pieces. For example, ready-made facades that have their own fixed dimensional grid.
There is no edge and all parameters associated with it. Concatenation in a clean list takes into account more parameters. In particular, the part number also gets here.
Glass tab
This tab is no different from the LDSP and MDF tabs. All project details of the "Glass" type are included here. The edge is also taken into account here, but other types of end treatment are implied:
- Grinding
- Polishing
- Facet
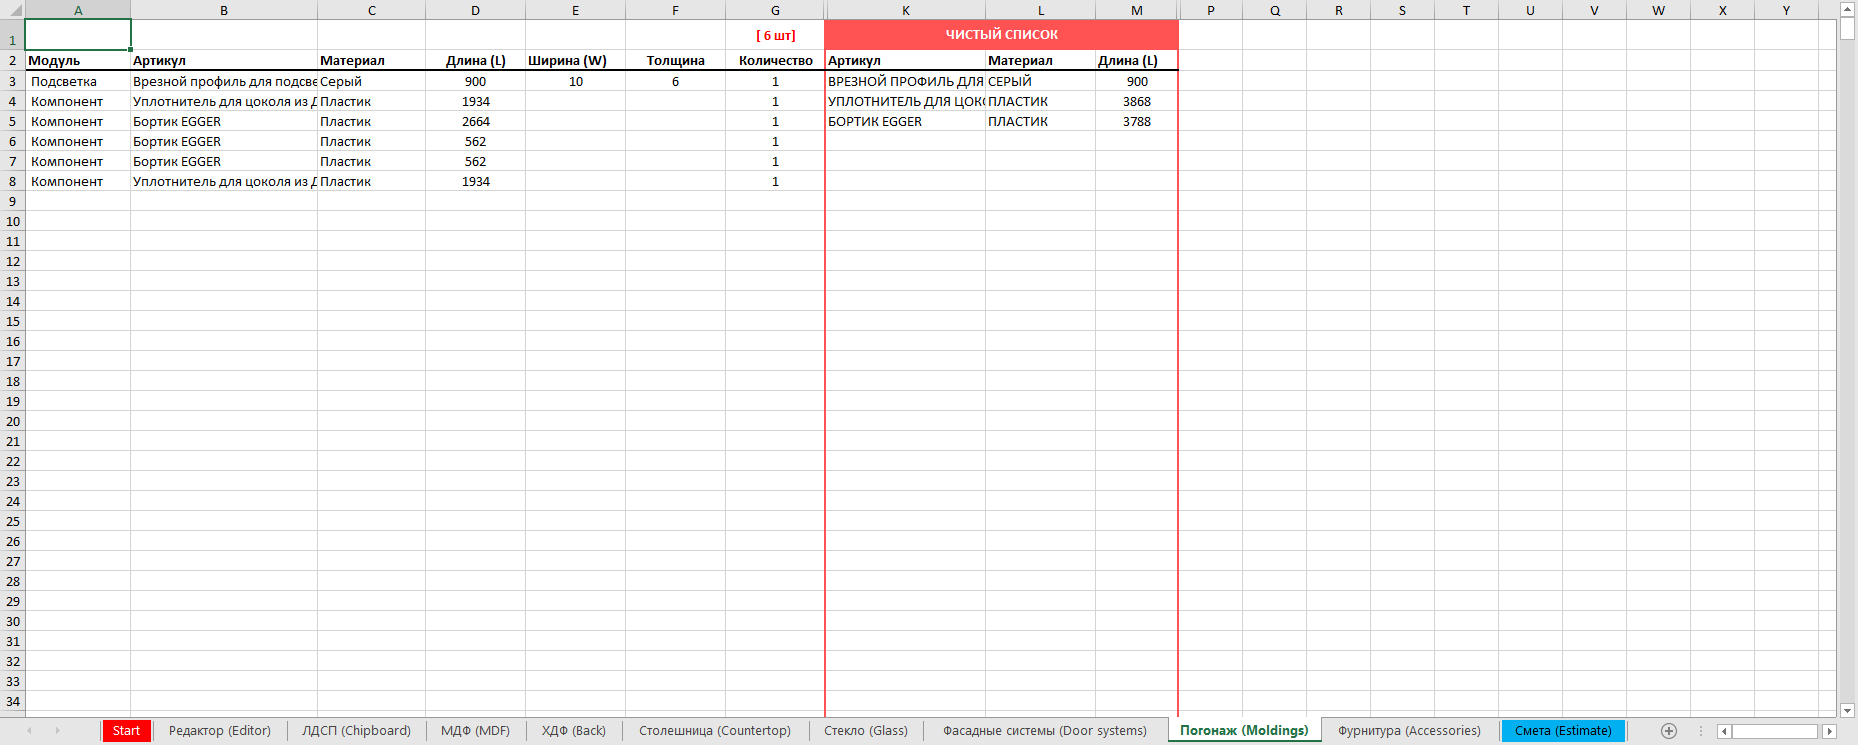
Moldings tab
All project parts of the "Mouldings" type are included here. Concatenation combines the footage of items that have the same article and material.
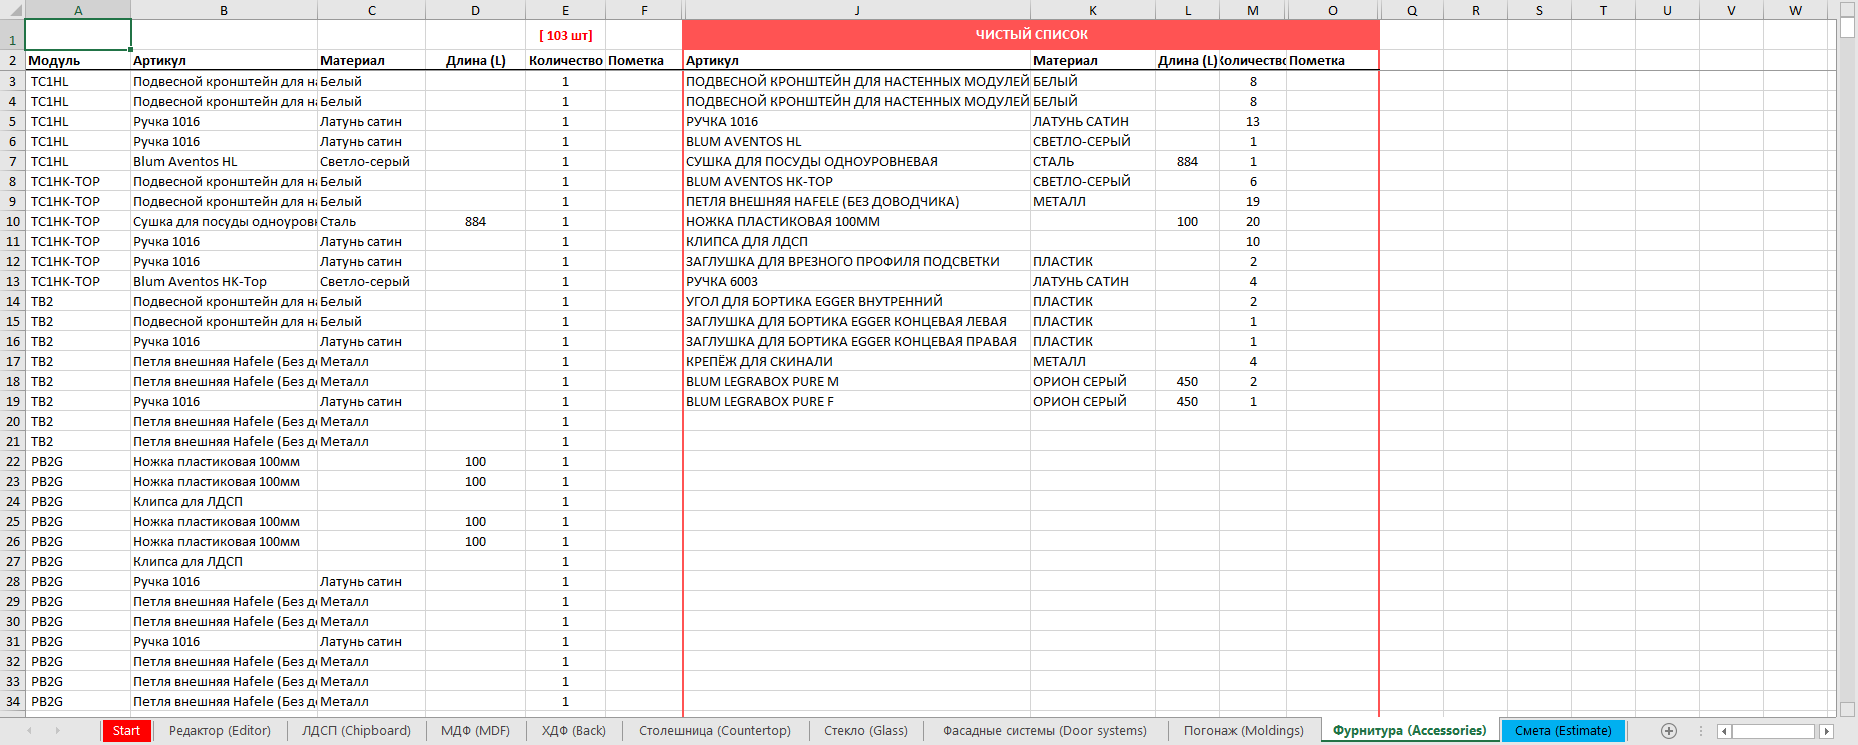
Fittings tab
All project parts of the "Fittings" type are included here. Concatenation combines items that have the same article, material, and item size.
Estimate tab
The final tab combines all the data from the other tabs and calculates the cost of the project:
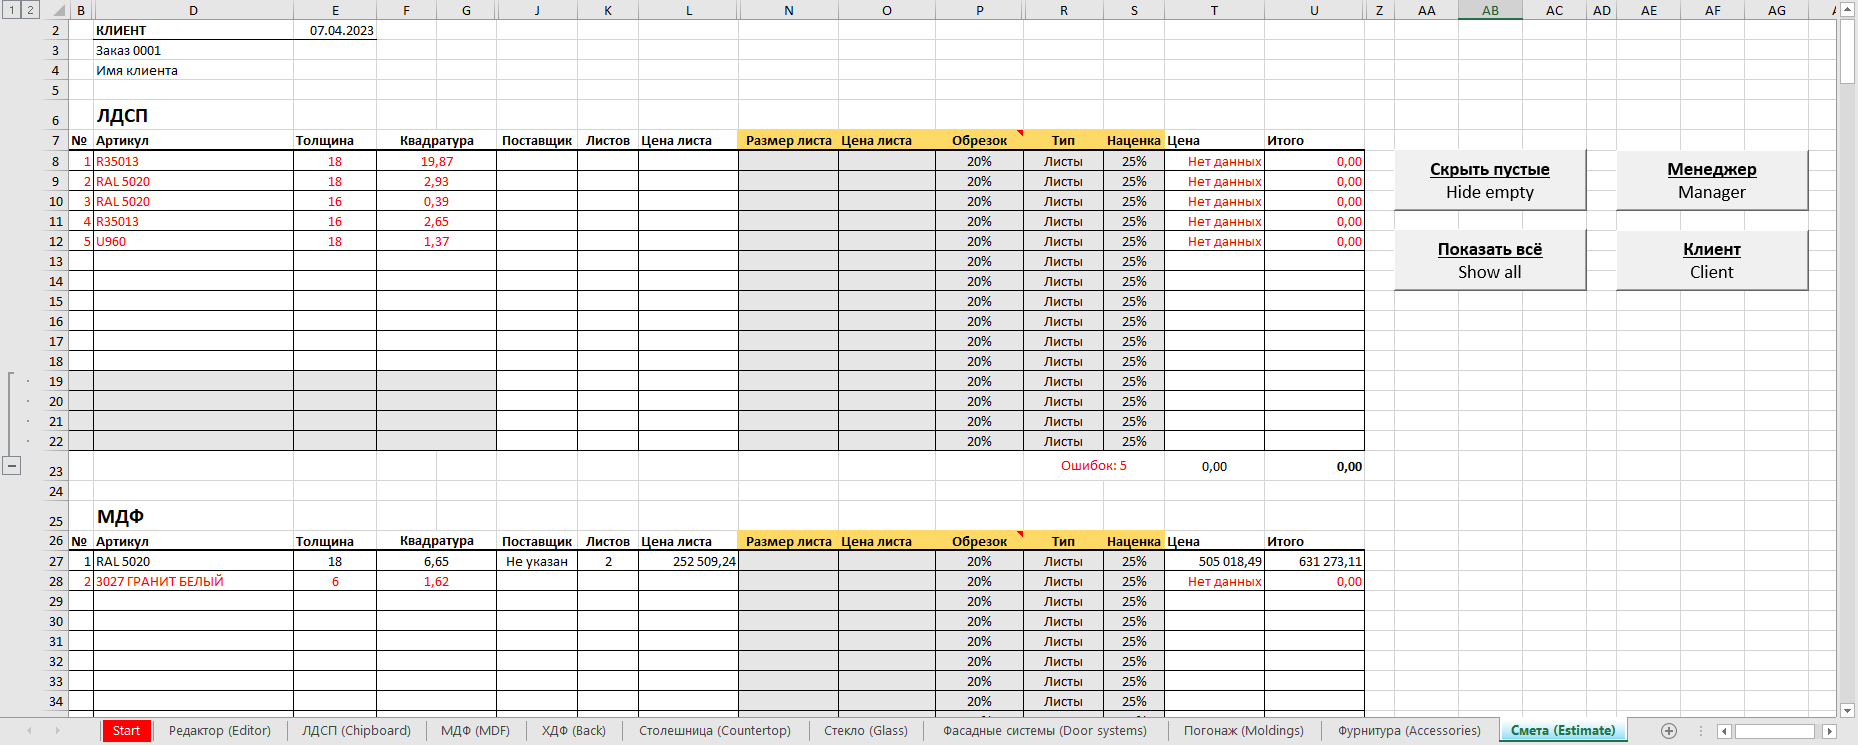
Here, all lists are summarized by the number of parts, square footage, footage or rods. These parameters can be changed. For example, one or another chipboard material can be counted in sheets or square footage. The number of sheets in the estimate is approximate, since only the net square footage is taken into account, without laying out the parts for cutting. You can increase the square footage of the material by changing the percentage of the surcharge. Usually, a 10-20% surcharge is enough for almost 100% coincidence of the approximate number of sheets with the actual one. The more sheets in the project, the smaller the percentage of the surcharge is needed.
The length of the mouldings can be calculated in rods or footage. All data for this is taken from the corresponding price lists. You can change prices, sheet square footage and rod length in the price list file tabs. The estimate will automatically recalculate all data.
Items that do not match the price list (the pricelist file is supplied with Redcut) are marked in red. These items are considered errors and are included at the end of the estimate. Be sure to check for such errors, as the price of such items will not be included in the final cost.
If a match is not found in the price list, there are 2 options to add a price:
- Set it manually, right here in the estimate. There is a separate column for this. Some items require additional data, such as sheet size or whip length. They are needed to calculate the cost of the item.
- Open the pricelist file and add a new item with all the data and price. Redcut will immediately find a match and pull the price from the price list.
There are four functional buttons in the "Estimate" tab:
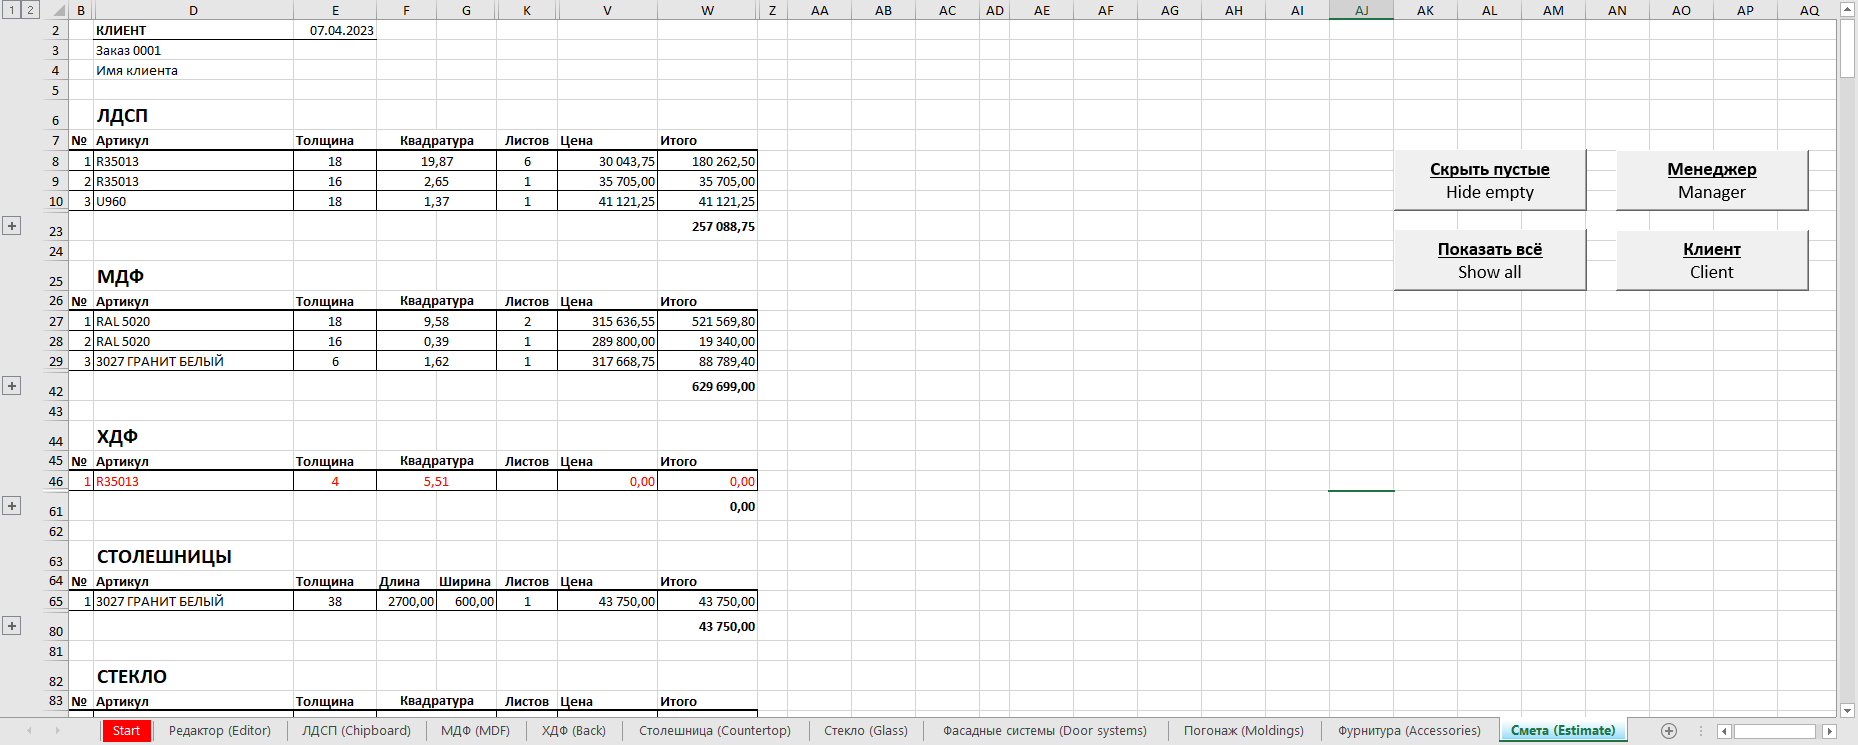
- Hide empty - hides all empty lines. A very convenient function that allows you to significantly reduce the list of estimates, leaving only filled lines.
- Show all - displays all previously hidden lines.
- Client mode - hides columns with base prices and parameters that the client should not see and displays additional columns that already indicate the final amounts, taking into account the added cost.
- Manager mode - Displays all columns except customer totals (which already match the totals in Manager mode).
This is what the Client mode looks like with the empty lines hidden:
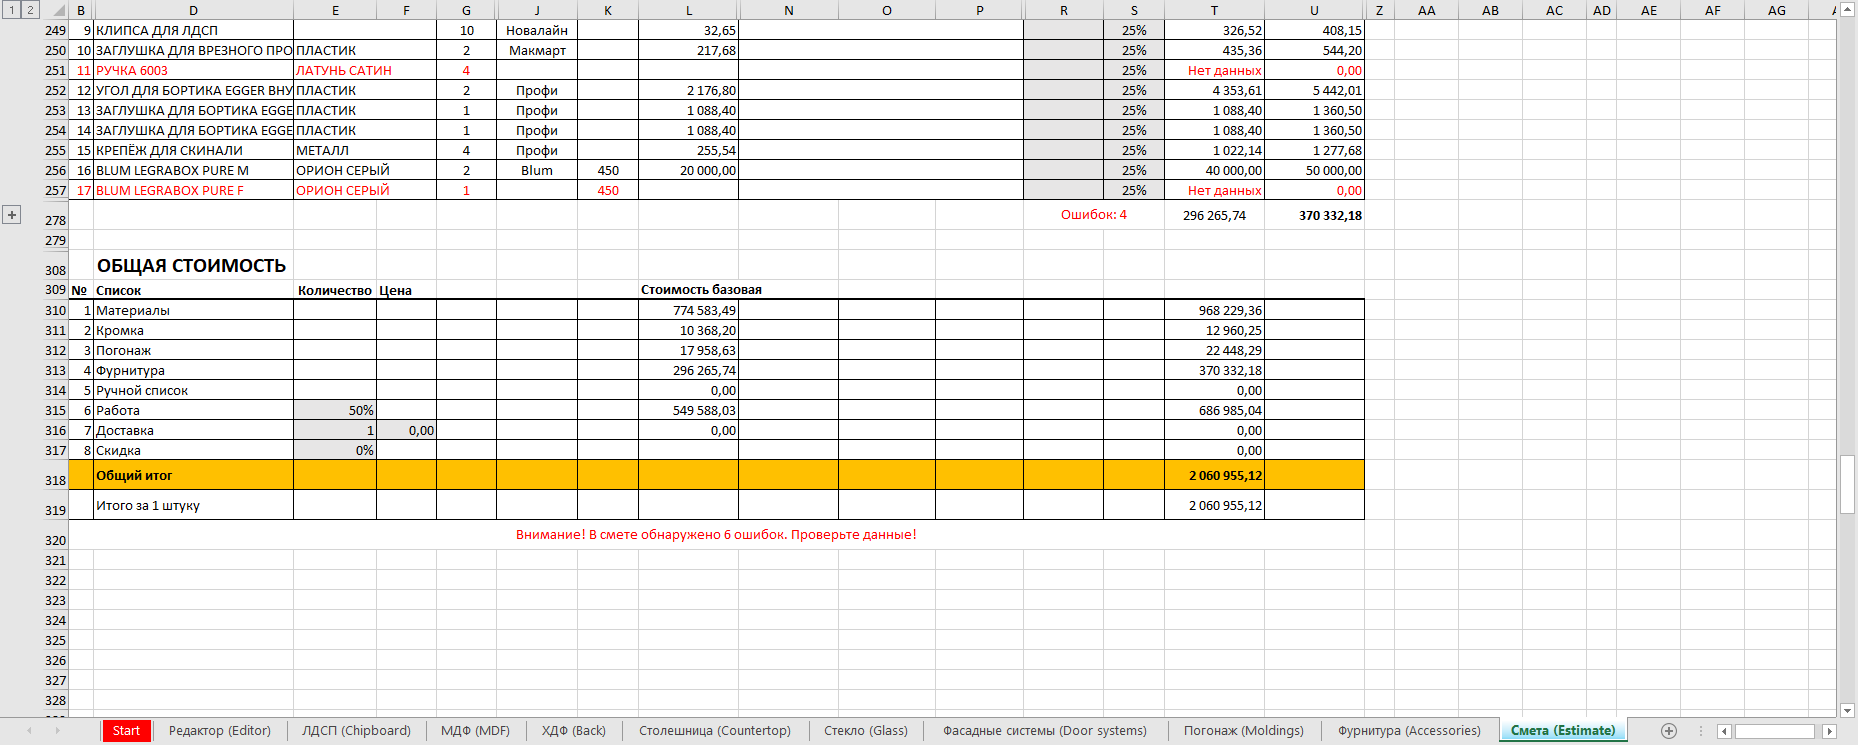
At the very end of the estimate table there is a block "Total cost", which shows the total amounts for materials, edging, fittings, etc. The markup percentage and the percentage of work are also adjusted there. Starting with Redcut 4.2.0, this block has additional functionality that checks the entire estimate for errors so that you do not forget anything.
Video about detailing and estimating in Redcut
In this video we talk about Redcut in detail and as an example we make a report on a small kitchen project. We recommend starting with this video.
If the video does not open, here is a direct link to the video.