


Article Contents
General Information
This is one of the most powerful and feature-rich tools in EasyKitchen. With a single click, it generates all the technical information required for your project, including the Parts List, Cost Estimate, and Cutting Layout.

How It Works
Select all the components you want to include in the calculation, then launch the tool.
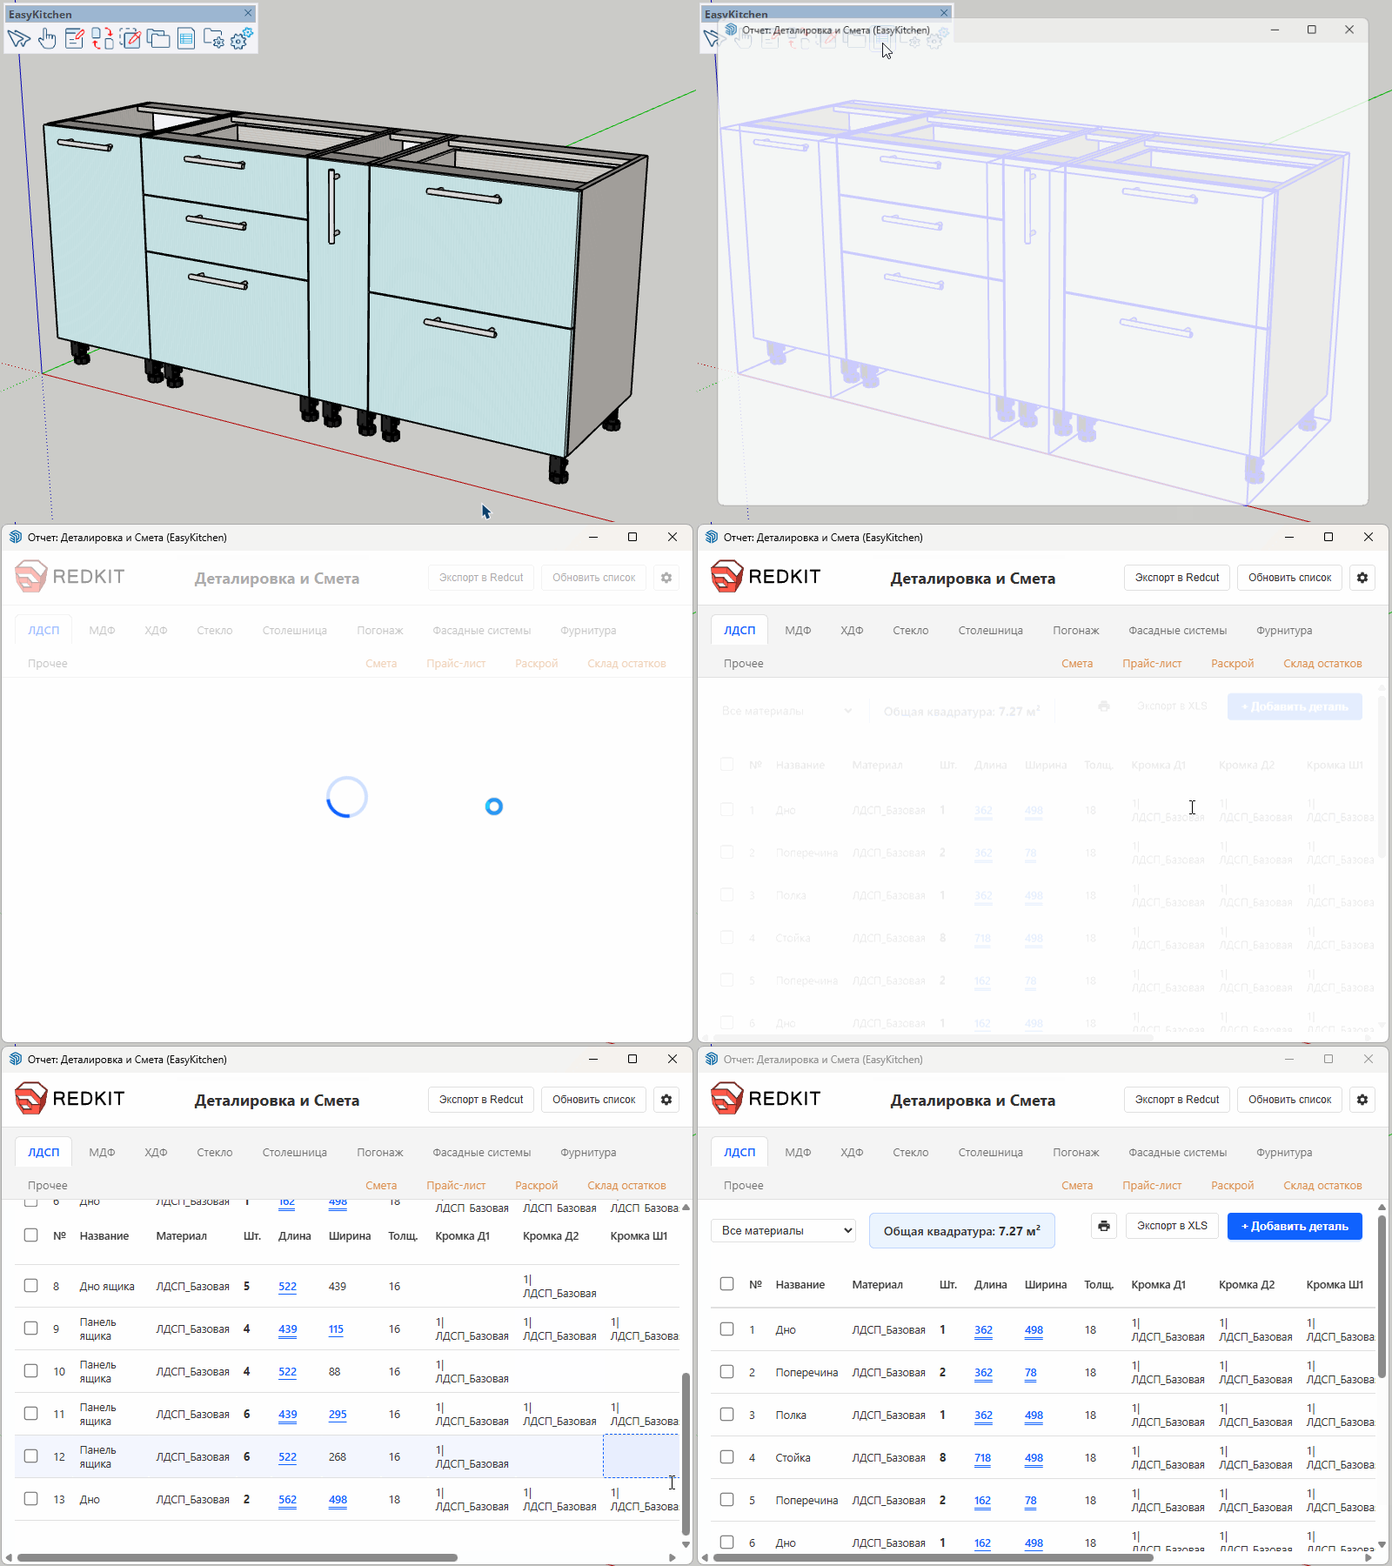
Depending on the size of the project and the performance of your computer, the calculation may take a few moments. In most cases, it only takes a few seconds.
Once the calculation is complete, the loading indicator will disappear and the first Parts List tab will be displayed.
Parts List Tabs
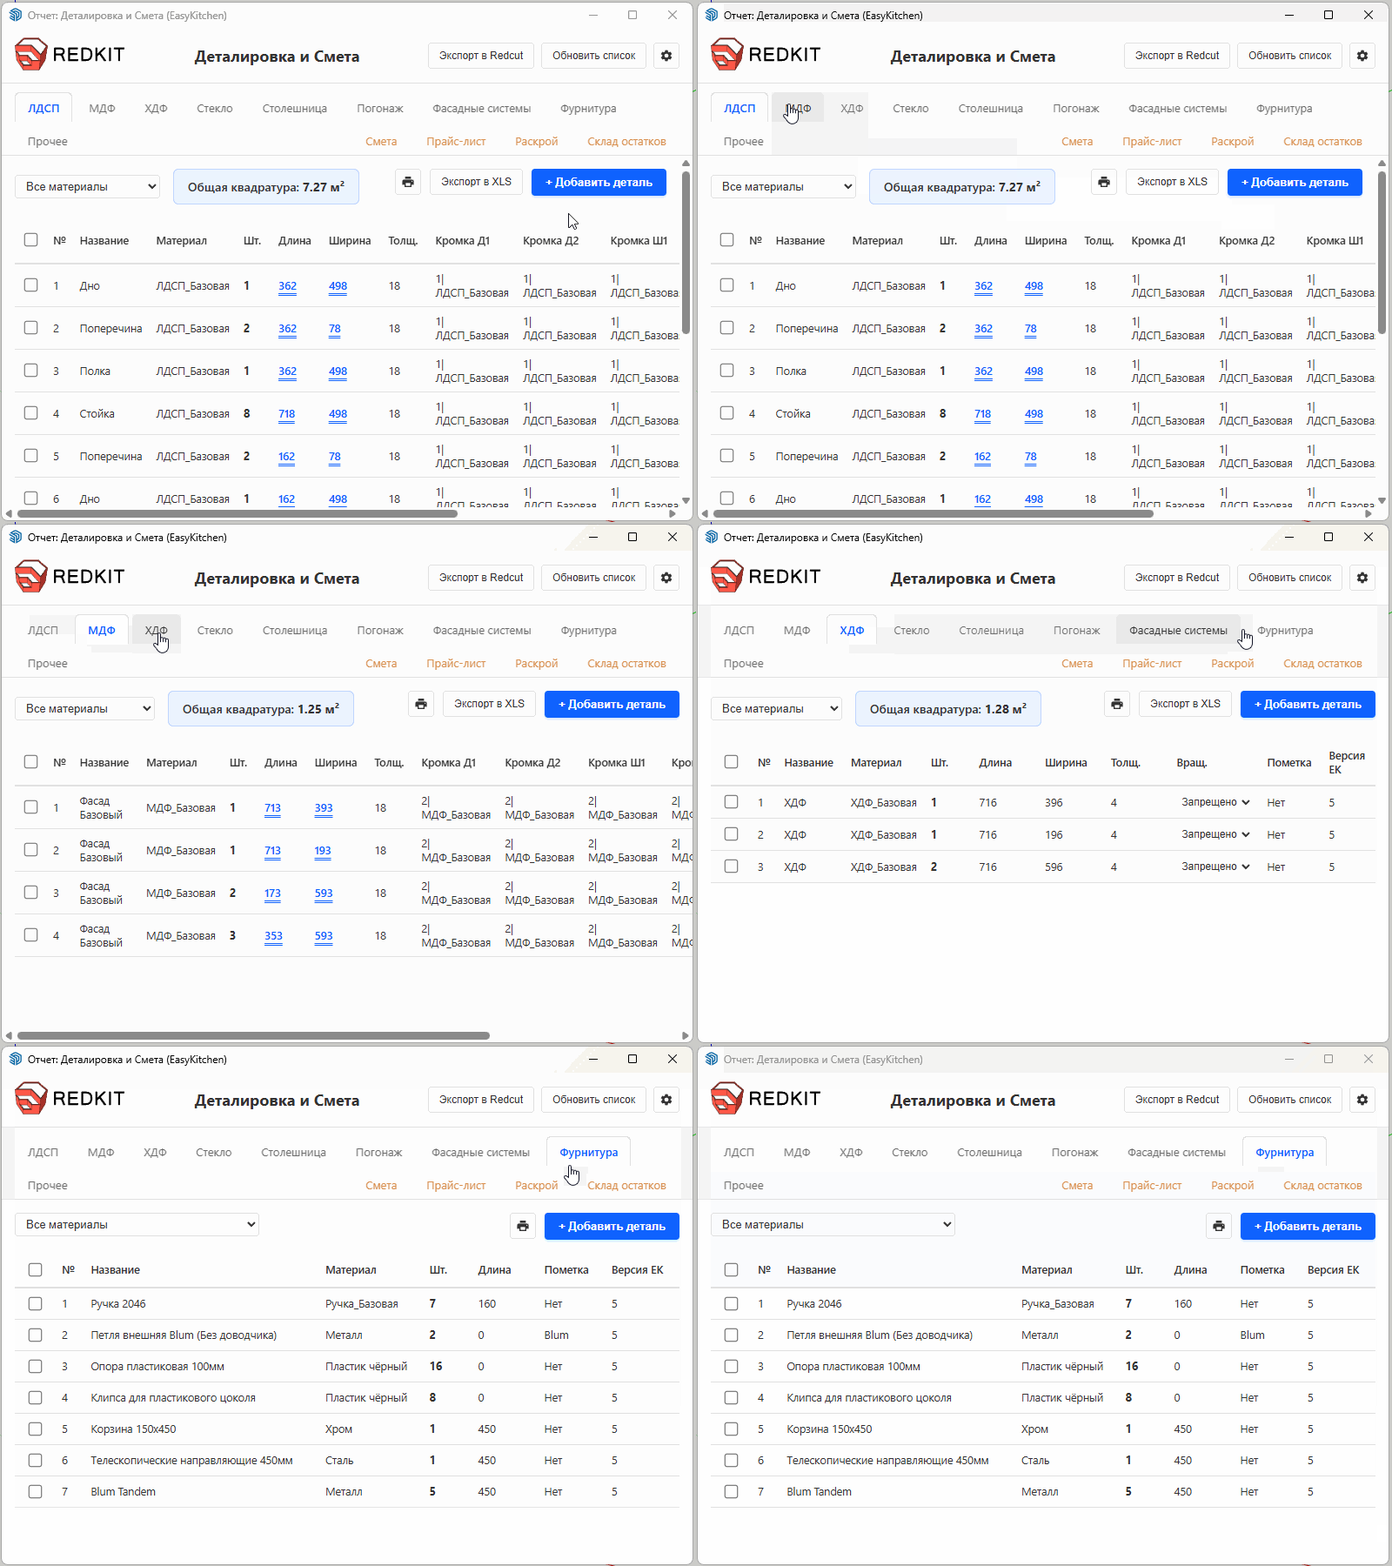
The first nine tabs are dedicated to the project's parts lists. They contain lists of sheet materials, hardware, edge banding, and other material categories.
Since all of these tabs work in a similar way, this article uses the Chipboard (MFC) tab as an example.
Controls
At the top of the tab is a drop-down list that allows you to choose which material's parts list to display.
By default, the list contains all materials that belong to the current category. Materials with the same name but different thicknesses are listed separately.
To the right of the material selector, the total surface area of the currently selected material is displayed. If All Materials is selected, the displayed area represents the total for all materials in the current category.
On the right side of the toolbar are buttons for:
- Printing the parts list.
- Exporting the parts list to an XLS file.
- Add Part, which lets you manually add a part that was accidentally omitted from the model.
Clicking Add Part opens a panel at the bottom of the window where you can specify all required parameters for the new part, including its name, type, material, length, width, and other properties.
After filling in the required fields, click Add Part. The new part will immediately appear in the parts list.
Parts List
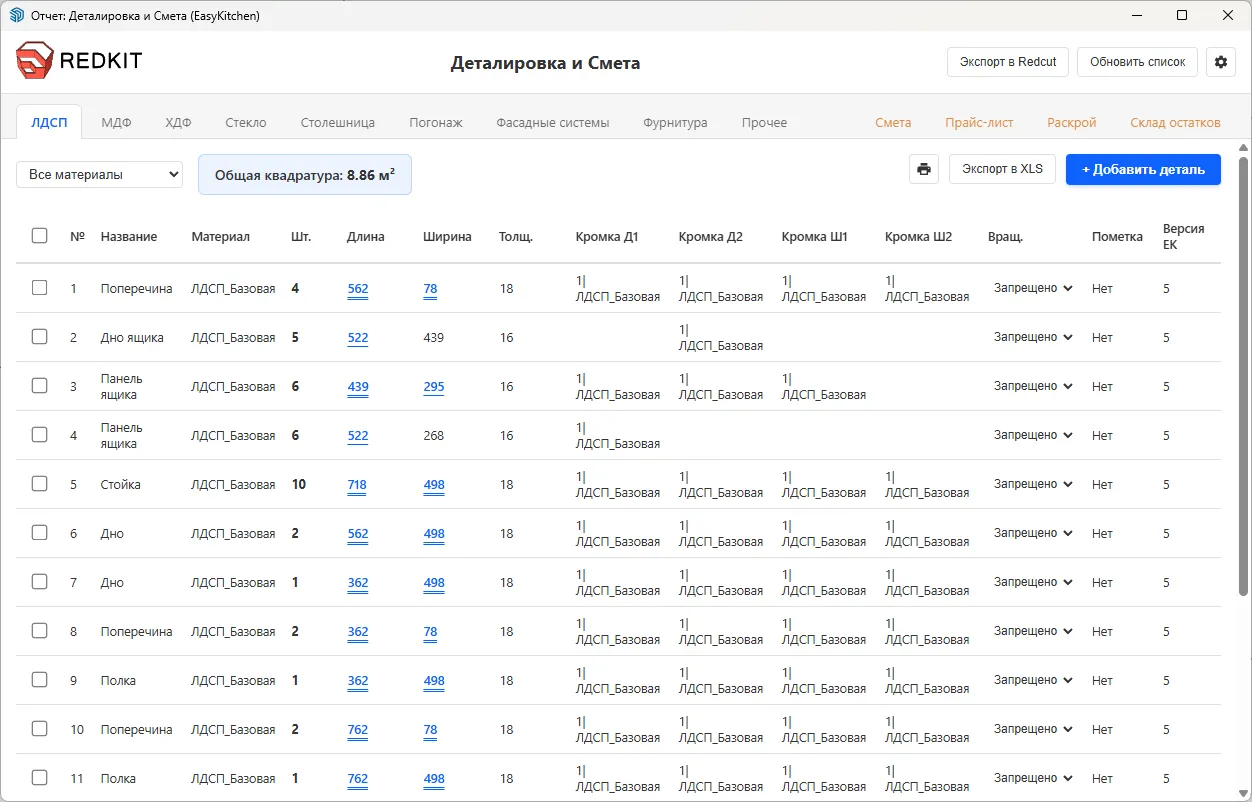
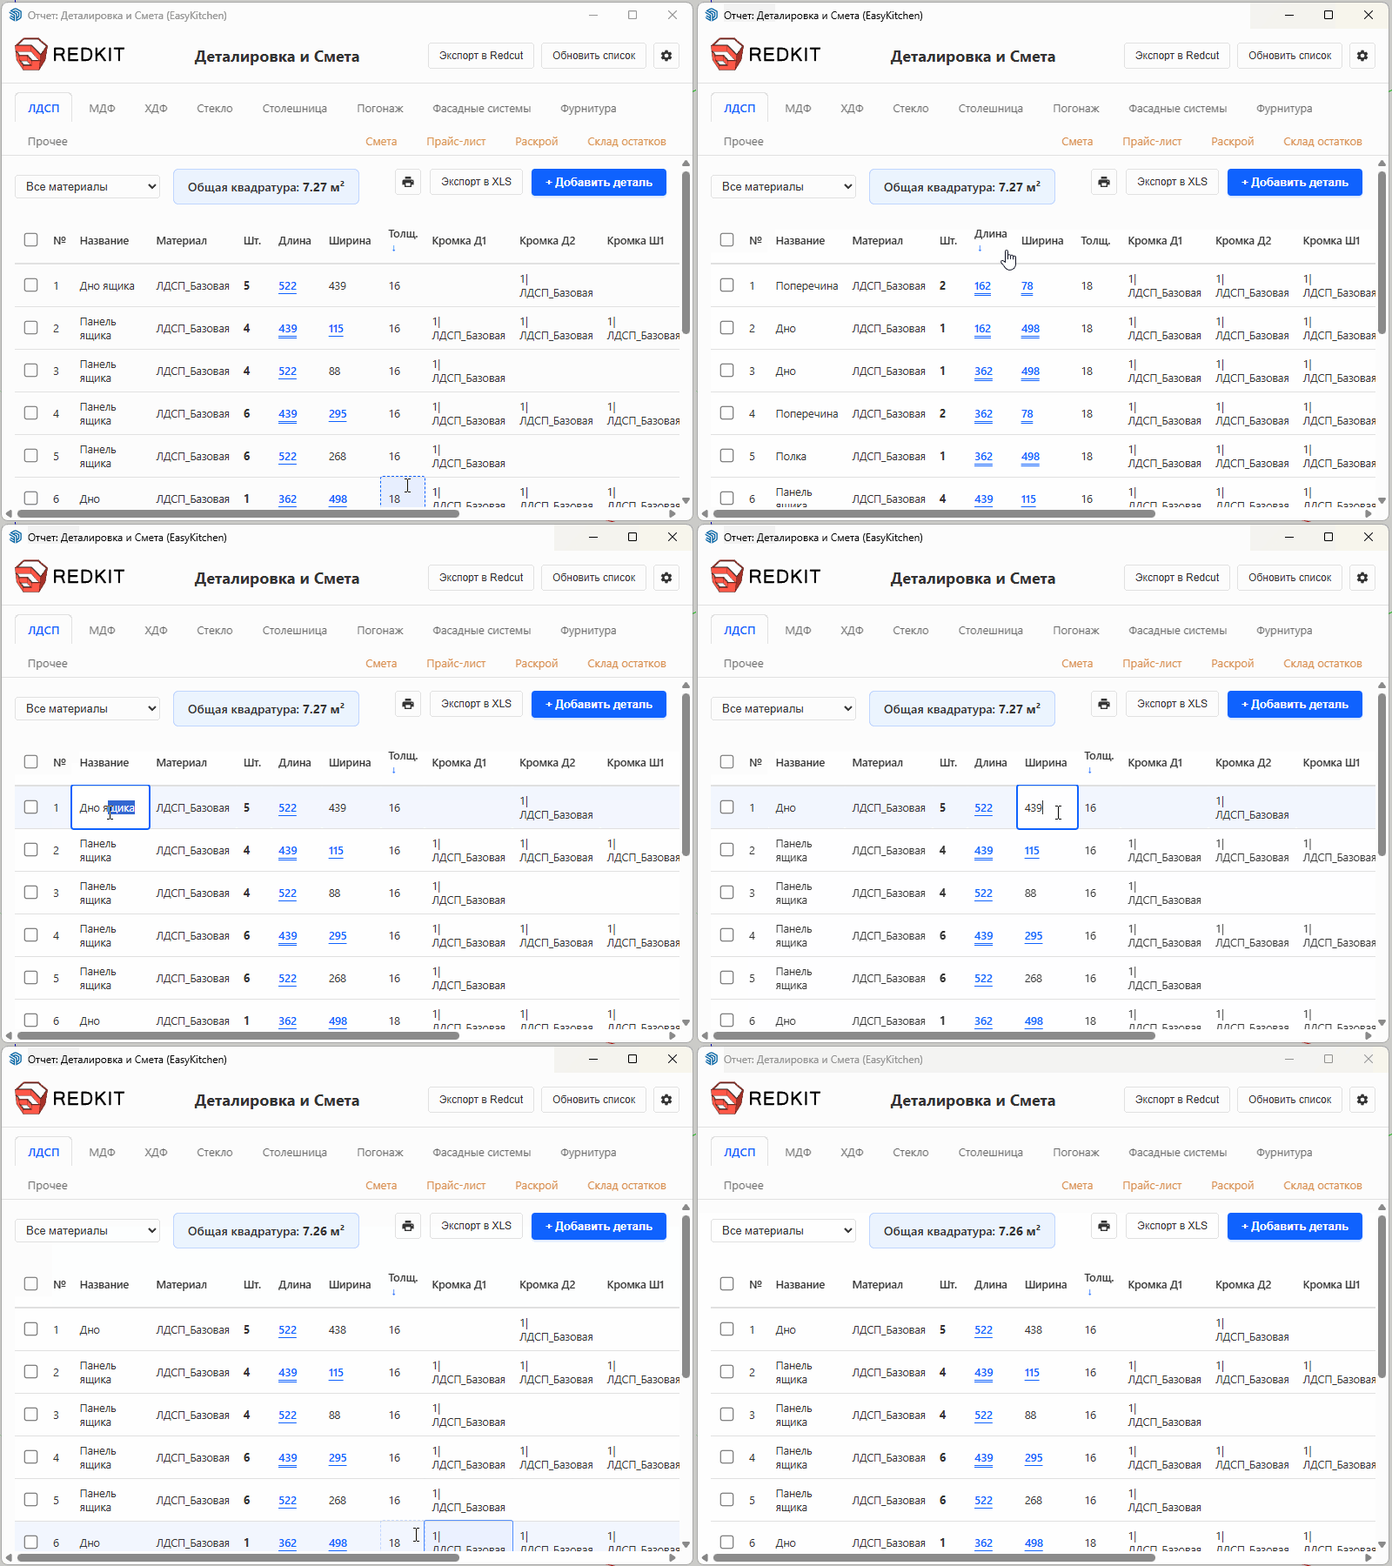
The parts list is displayed as a sortable table.
Click any column header to sort the list by that column. For example, you can sort by Part Name to display the list alphabetically.
Almost every value in the table can be edited directly. Simply click a field and enter the desired value.
For example, if a part was assigned the wrong thickness in the model, you can quickly correct it directly in the parts list without rebuilding the project.
Only the Part Number and EK Version fields cannot be edited.
The tool also supports bulk editing.
Select multiple parts using the checkboxes. A batch editing panel will appear at the bottom of the window, displaying all editable fields.
If the selected parts contain different values for the same field, the editor displays Mixed... for that property.
After making your changes, click Apply to update all selected parts at once.
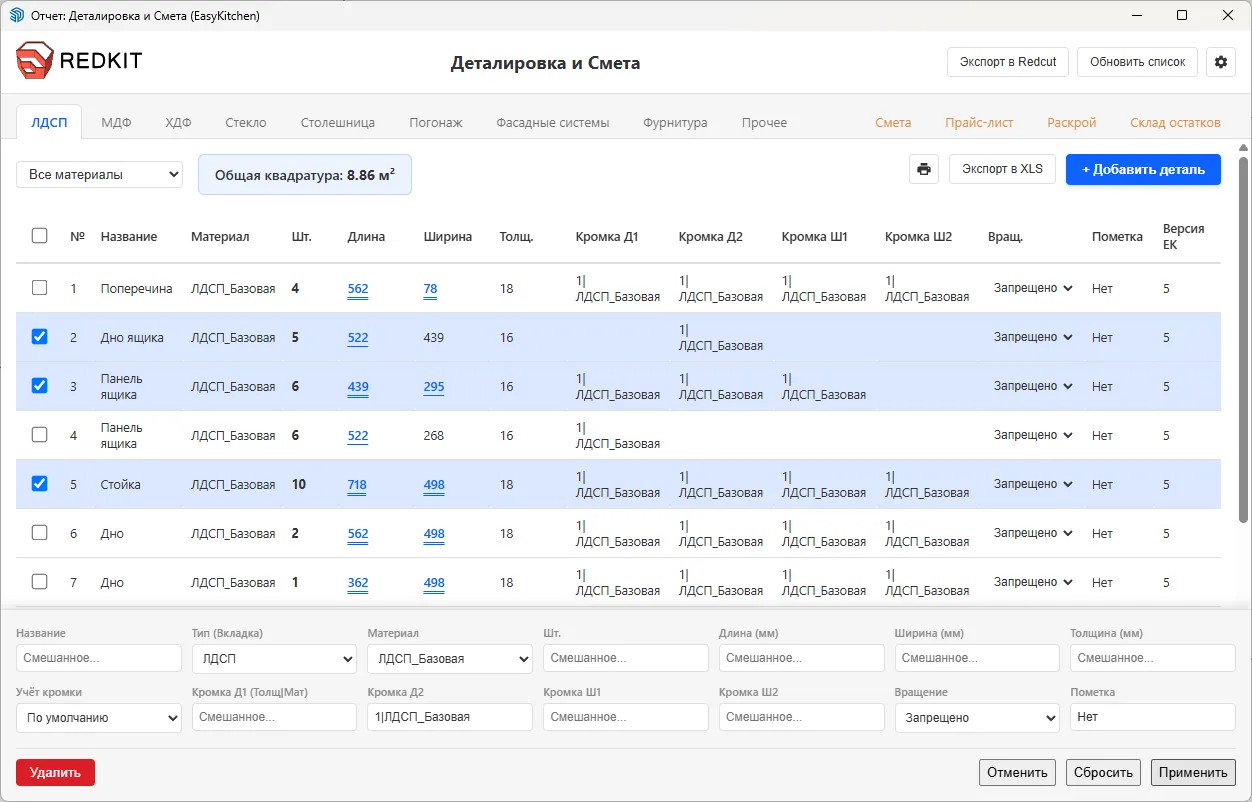
The editor also includes the following buttons:
- Cancel — closes the editor.
- Reset — restores the original values.
- Delete — removes the selected part from the parts list.
If you need to restore the parts list to its original state, click Refresh List in the upper-right corner of the Parts List & Estimate window.
The project will be recalculated, and the entire parts list will be regenerated from the current model.
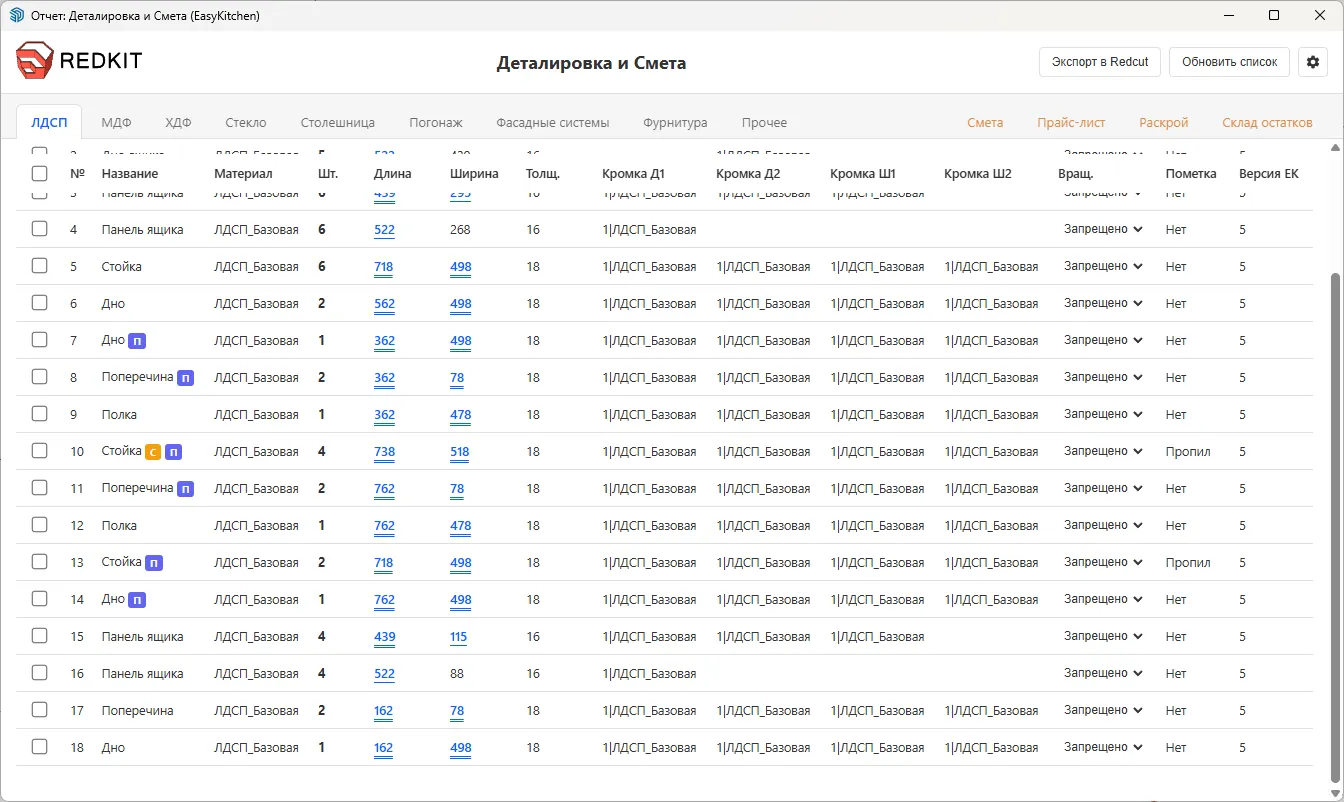
Glue Joint and Saw Cut Badges
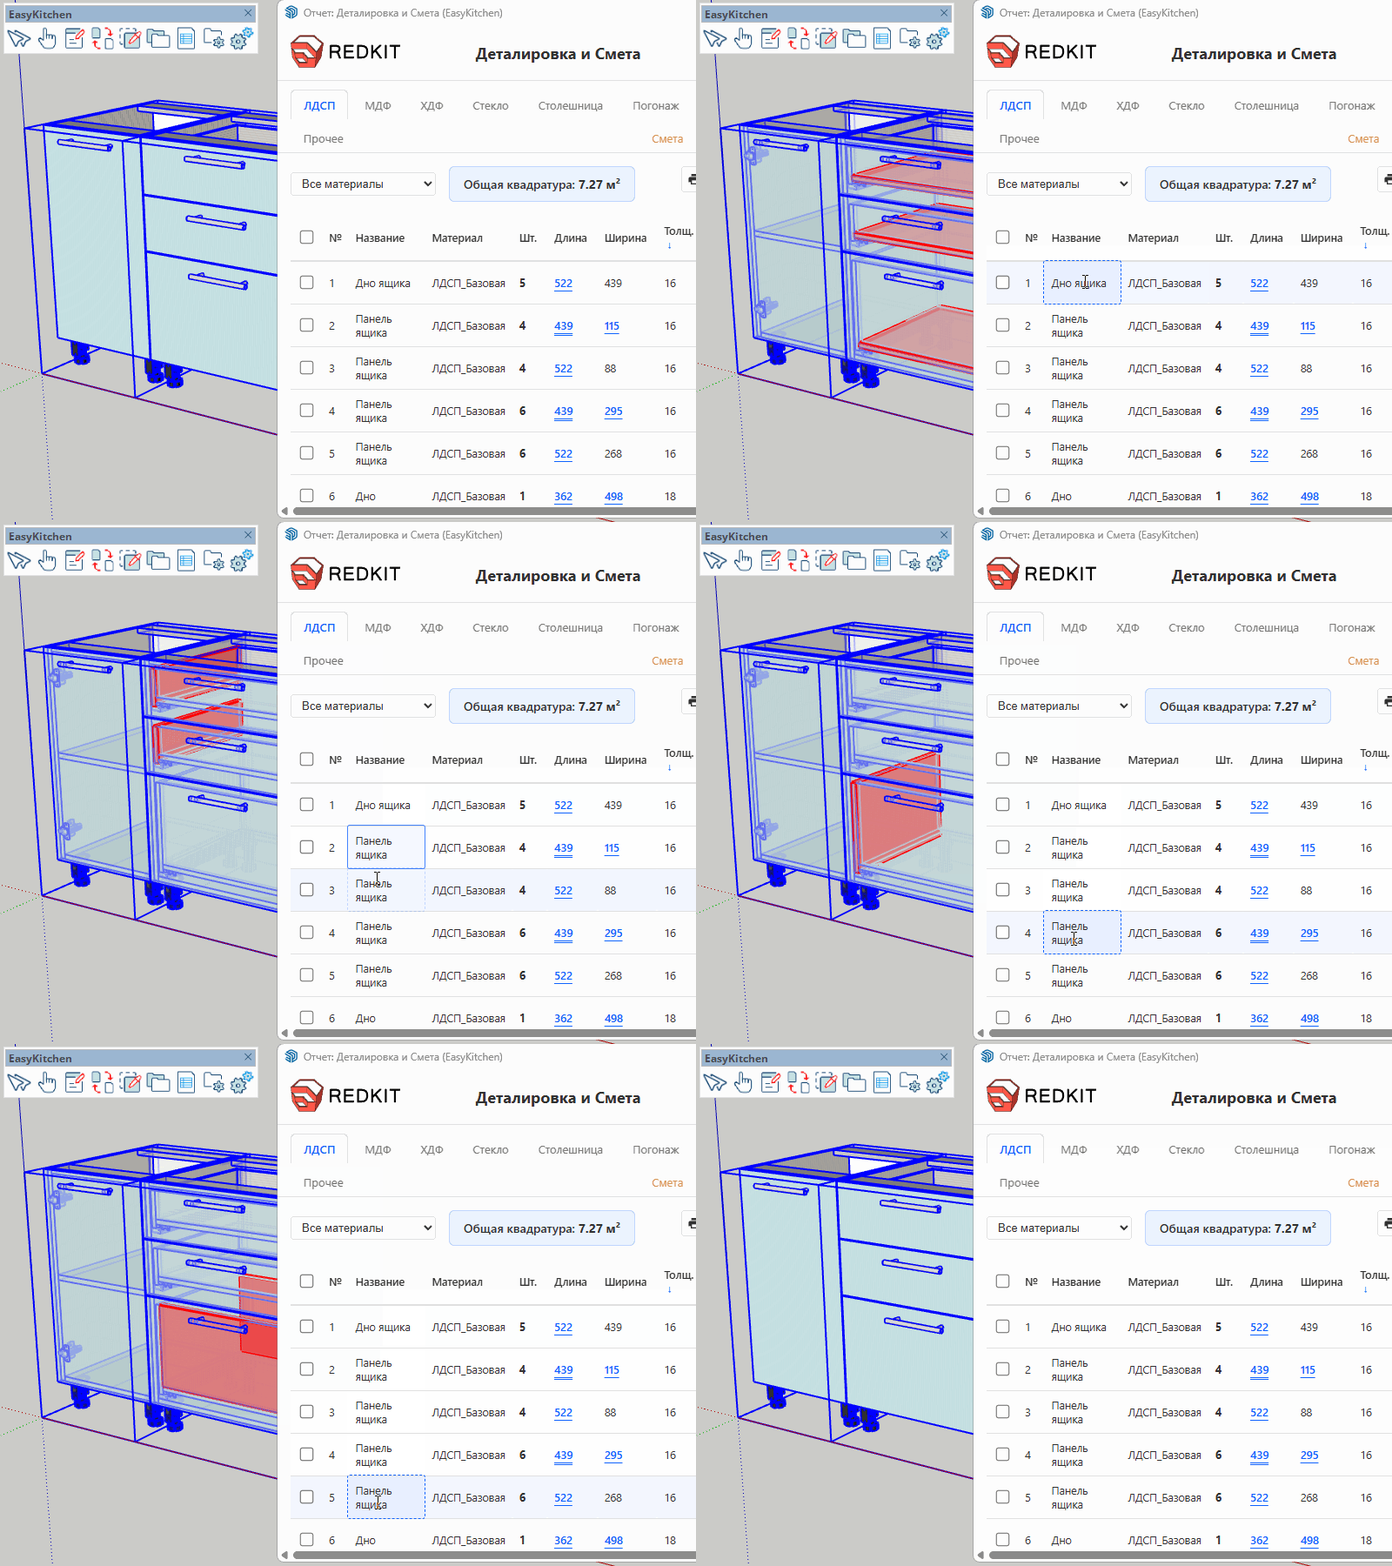
All Parts List tabs support interactive part highlighting.
Simply hover your mouse over any item in the list, and the corresponding part will instantly be highlighted in red within the SketchUp model. At the same time, the rest of the model becomes semi-transparent, making it easy to identify the selected part.
This feature works with sheet materials, hardware, and linear materials alike.
No more time-consuming searching for parts in your model — everything is instantly visible at a glance.
Highlighting Parts in the Model
Every Parts List tab supports interactive part highlighting.
Simply move the mouse pointer over any item in the list, and the corresponding part will immediately be highlighted in red within the SketchUp model.
At the same time, the rest of the model becomes semi-transparent, making the selected part easy to locate.
This feature works for sheet materials, hardware, and linear materials alike.
No more manually searching through complex projects — simply hover over a list item to instantly find the corresponding object in the model.
Estimate Tab
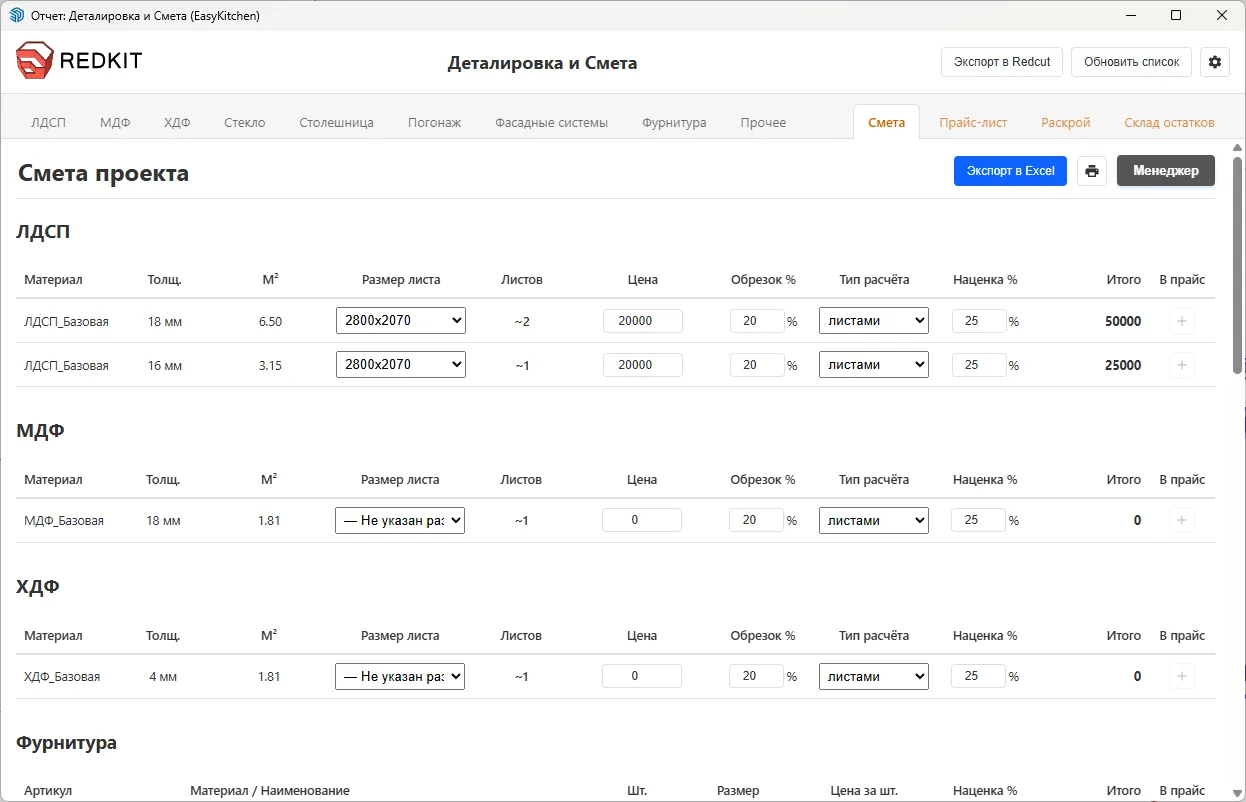
The Estimate tab contains the complete cost estimate for the current project.
It is divided into sections that correspond to the Parts List tabs. For example, the Chipboard (MFC) section displays and calculates all materials listed in the Chipboard (MFC) parts list, while the Hardware section includes all hardware items from the Hardware tab.
Controls
At the top of the Estimate tab, you'll find an editable project title and three action buttons:
- Export to Excel – exports the current estimate as an .xlsx file.
- Print – prints the estimate or saves it as a PDF.
- Manager / Client – switches between the available display modes.
Display Modes
The Estimate supports two display modes:
- Manager – displays all estimate columns and editing options.
- Client – displays only the columns that are enabled in the Parts List & Estimate tool settings.
You can switch between these modes using the Manager / Client button in the upper-right corner of the Estimate tab.
Editable Fields
Most estimate rows contain editable fields. For sheet materials such as Chipboard (MFC), MDF, HDF, Glass, and Countertops, you can specify the sheet size used for the calculations.
The available sheet sizes can be configured in the Parts List & Estimate tool settings.
You can also manually edit values such as:
- Price
- Markup
- Waste percentage
By default, these values are loaded from the Price List.
You can also choose the calculation method:
- By sheet
- By area
Similar editable fields are available in most other estimate sections.
Integration with the Price List Tab
By default, the Estimate attempts to match every material with an entry in the Price List tab.
It compares several material properties to find the correct match. If a matching item is found, all available parameters—such as sheet size, price, markup, and waste percentage—are automatically imported into the estimate.
You can override any of these values manually. Once edited, that value becomes the active one, and a warning icon appears next to the field to indicate that it has been modified.
Clicking the warning icon restores the original value from the Price List.
If no matching material is found, you can enter all required parameters manually, including sheet size, price, markup, and waste percentage.
Once enough information has been entered, a + button becomes available at the end of the row.
Clicking this button adds the current material to the Price List, allowing EasyKitchen to remember it for future projects. The next time this material is used, its parameters will be filled in automatically.
This functionality is available for most estimate sections.
Manual Items
The Manual Items section allows you to add custom estimate items that are not generated automatically.
Click Add Item in the upper-right corner of this section to create a new entry.
Each new row contains a drop-down list of items that you have previously added to the Manual Items category in the Price List tab.
Initially, this list is empty. Simply add your frequently used custom items to the Price List, and they will become available here for quick selection.
Additional Items
The Additional Items section contains four predefined services by default:
- Labor – adds labor costs as either a fixed amount or a percentage of the estimate.
- Installation – adds installation costs as either a fixed amount or a percentage of the estimate.
- Delivery – adds delivery costs as either a fixed amount or a percentage of the estimate.
- Discount – applies a fixed discount or a percentage discount to the estimate.
You can also add your own custom services by clicking + Add Service.
A new row will be created, allowing you to configure the service name, calculation method, and value as needed.
Price List Tab
The Price List is the primary source of data for the Estimate. Most values displayed in the estimate are automatically retrieved from this tab.
The Cutting Layout tool also uses the Price List to obtain sheet dimensions for sheet materials.
Controls
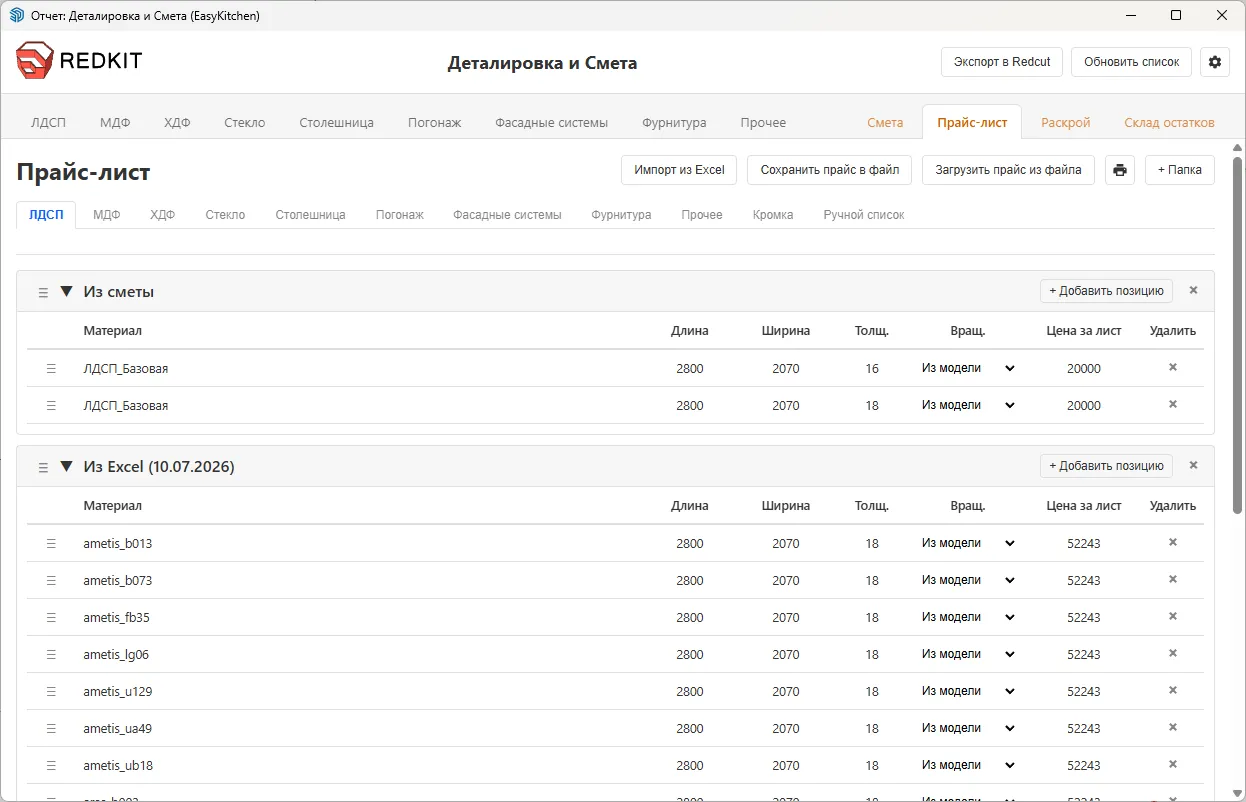
At the top of the Price List tab, you'll find several useful buttons:
- Import from Excel – imports items from an Excel spreadsheet into the Price List. The Excel file should contain a header row followed by the list of items.
- Save Price List – saves the entire Price List to a separate file. This makes it easy to share a configured Price List with other team members or transfer it to another computer.
- Load Price List – imports a previously saved Price List file, including one created on another device.
- Print – prints the currently selected Price List tab or saves it as a PDF.
- + Folder – creates a new folder within the current Price List tab. Folders help organize items into logical categories. Both folders and individual items can be reordered at any time by dragging them with the mouse.
Tabs and Contents
The Price List is divided into multiple tabs, each representing a different material or hardware category.
Each tab can contain one or more folders. Folders can be created, deleted, renamed, and reordered simply by dragging them.
Items can also be moved by drag and drop, either within the same folder or between different folders.
Individual items can be added manually using the Add Item button or automatically from the Estimate by clicking the + button next to a material.
The second method is recommended because it eliminates typing mistakes and ensures that all parameters are transferred correctly.
If you need to add many items at once, use the Import from Excel function.
Integration with Other Tabs
As mentioned earlier, the Cutting Layout uses the sheet dimensions stored in the Price List.
For accurate cutting layouts, make sure the sheet sizes for your materials are configured correctly in the Price List before calculating the project.
A particularly important setting is the Part Rotation column.
By default, this option is set to From Model, meaning the Cutting Layout uses the rotation setting specified for each individual part in the model.
However, you can override this behavior by defining the rotation rule directly in the Price List for a specific material.
This is especially useful for solid-color materials, which can usually be rotated freely during cutting.
Once rotation is enabled for a material in the Price List, you no longer need to enable rotation for every individual part. Whenever that material is used in a project, the Cutting Layout will automatically allow part rotation based on the Price List settings.
Cutting Tab
The Cutting Layout tab allows you to generate optimized cutting layouts for all sheet materials in your project.
The optimization algorithm arranges parts as efficiently as possible to minimize material waste. The tool also supports manual part movement, part rotation, remnant management, and many other advanced features.
Controls
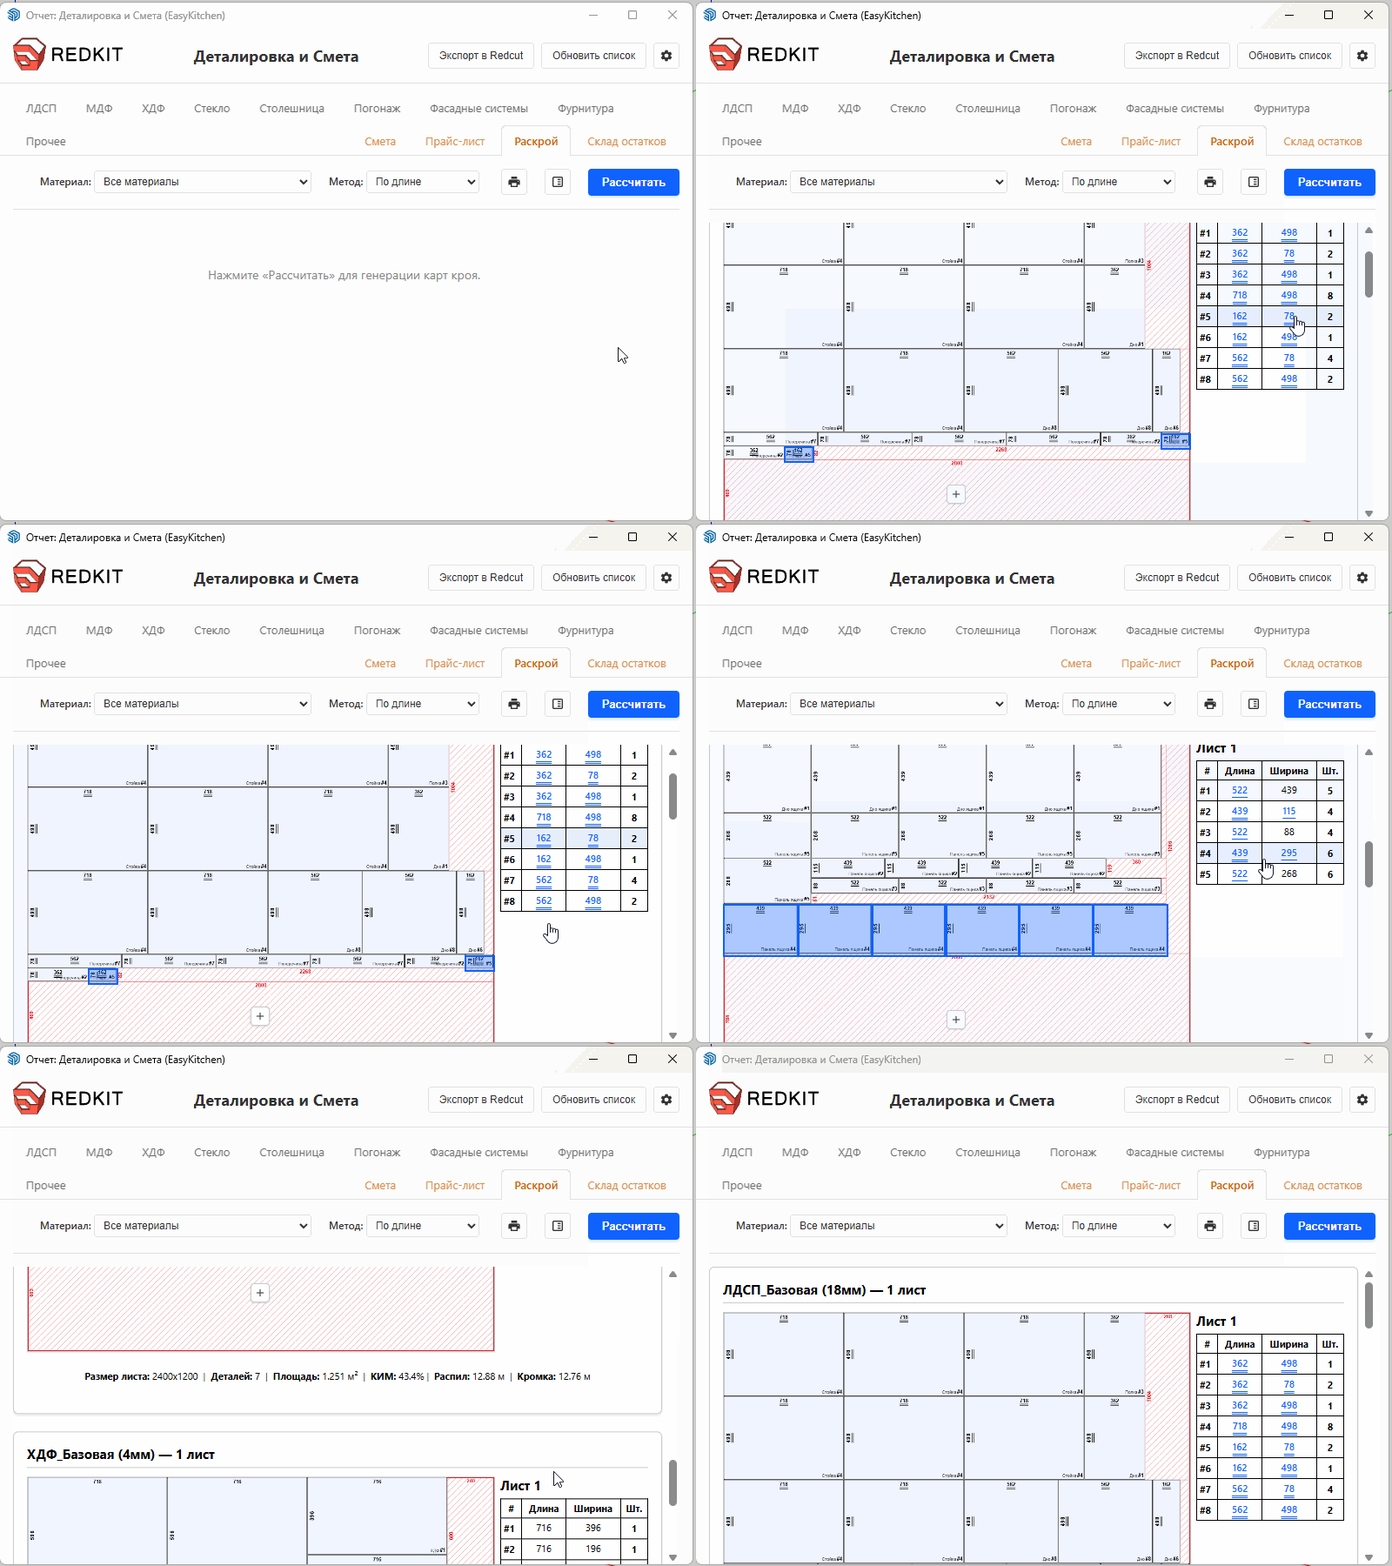
At the top of the Cutting Layout tab, you'll find several useful controls:
-
Material List – a drop-down list for selecting the material to optimize. By default, All Materials is selected, generating cutting layouts for every sheet material in the project.
-
Optimization Method – choose between Optimal, By Length, and By Width.
-
Print – prints the cutting layouts or exports them as a PDF.
-
Parts Buffer – opens a side panel where parts can be temporarily stored while rearranging the layout.
- Calculate – instantly generates the cutting layouts.
Cutting Layout Appearance
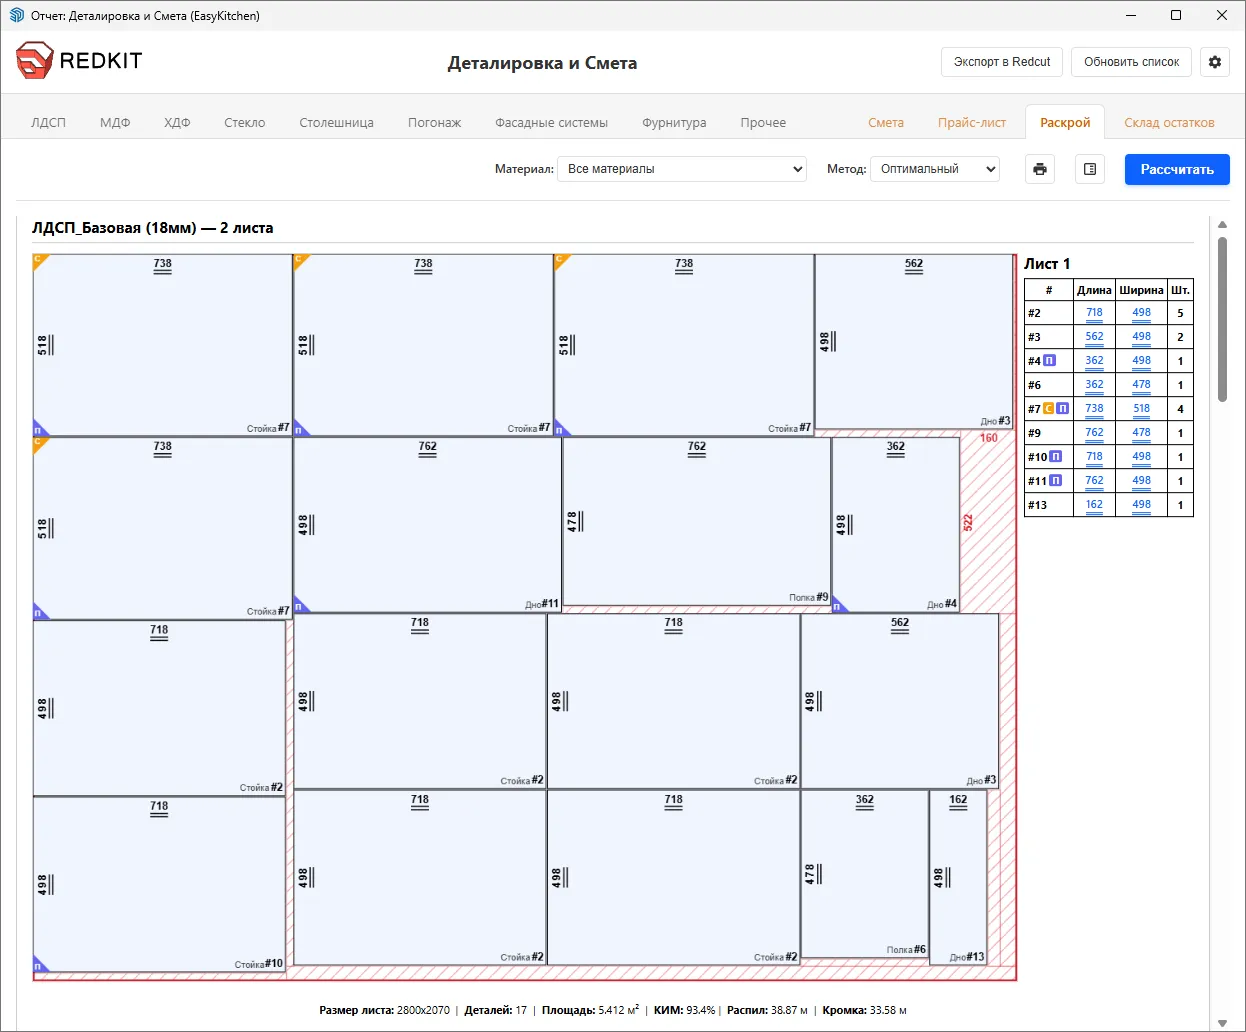
Each cutting layout displays the material name, sheet thickness, and the number of sheets used.
On the layout:
- Parts are shown in blue.
- Remnants are displayed as red hatched areas.
Part dimensions can be displayed either inside the part or along its edges. This behavior is configured in the Parts List & Estimate tool settings.
Remnant dimensions are always displayed along the edges.
Edge banding is indicated beneath each part using one or two lines, depending on the edge configuration.
The lower-right corner of each part displays its part number, and the part name appears to the left if this option is enabled in the settings.
Parts marked for saw trimming display a purple "P" badge in the lower-left corner.
Parts marked for glue-up display a yellow "G" badge in the upper-left corner.
Some remnants display a + button. Clicking it adds the remnant to the Remnant Stock for future projects. The minimum remnant size required for this option is configured in the Parts List & Estimate tool settings.
At the bottom of each cutting layout, the following information is displayed:
- Sheet size
- Number of parts
- Total part area
- Material usage
- Total cutting length
- Total edge banding length
On the right side of the layout is a numbered list of all parts on the sheet, including their edge banding information. The same glue-up and saw-trimming badges are also shown in this list.
Cutting Layout Features
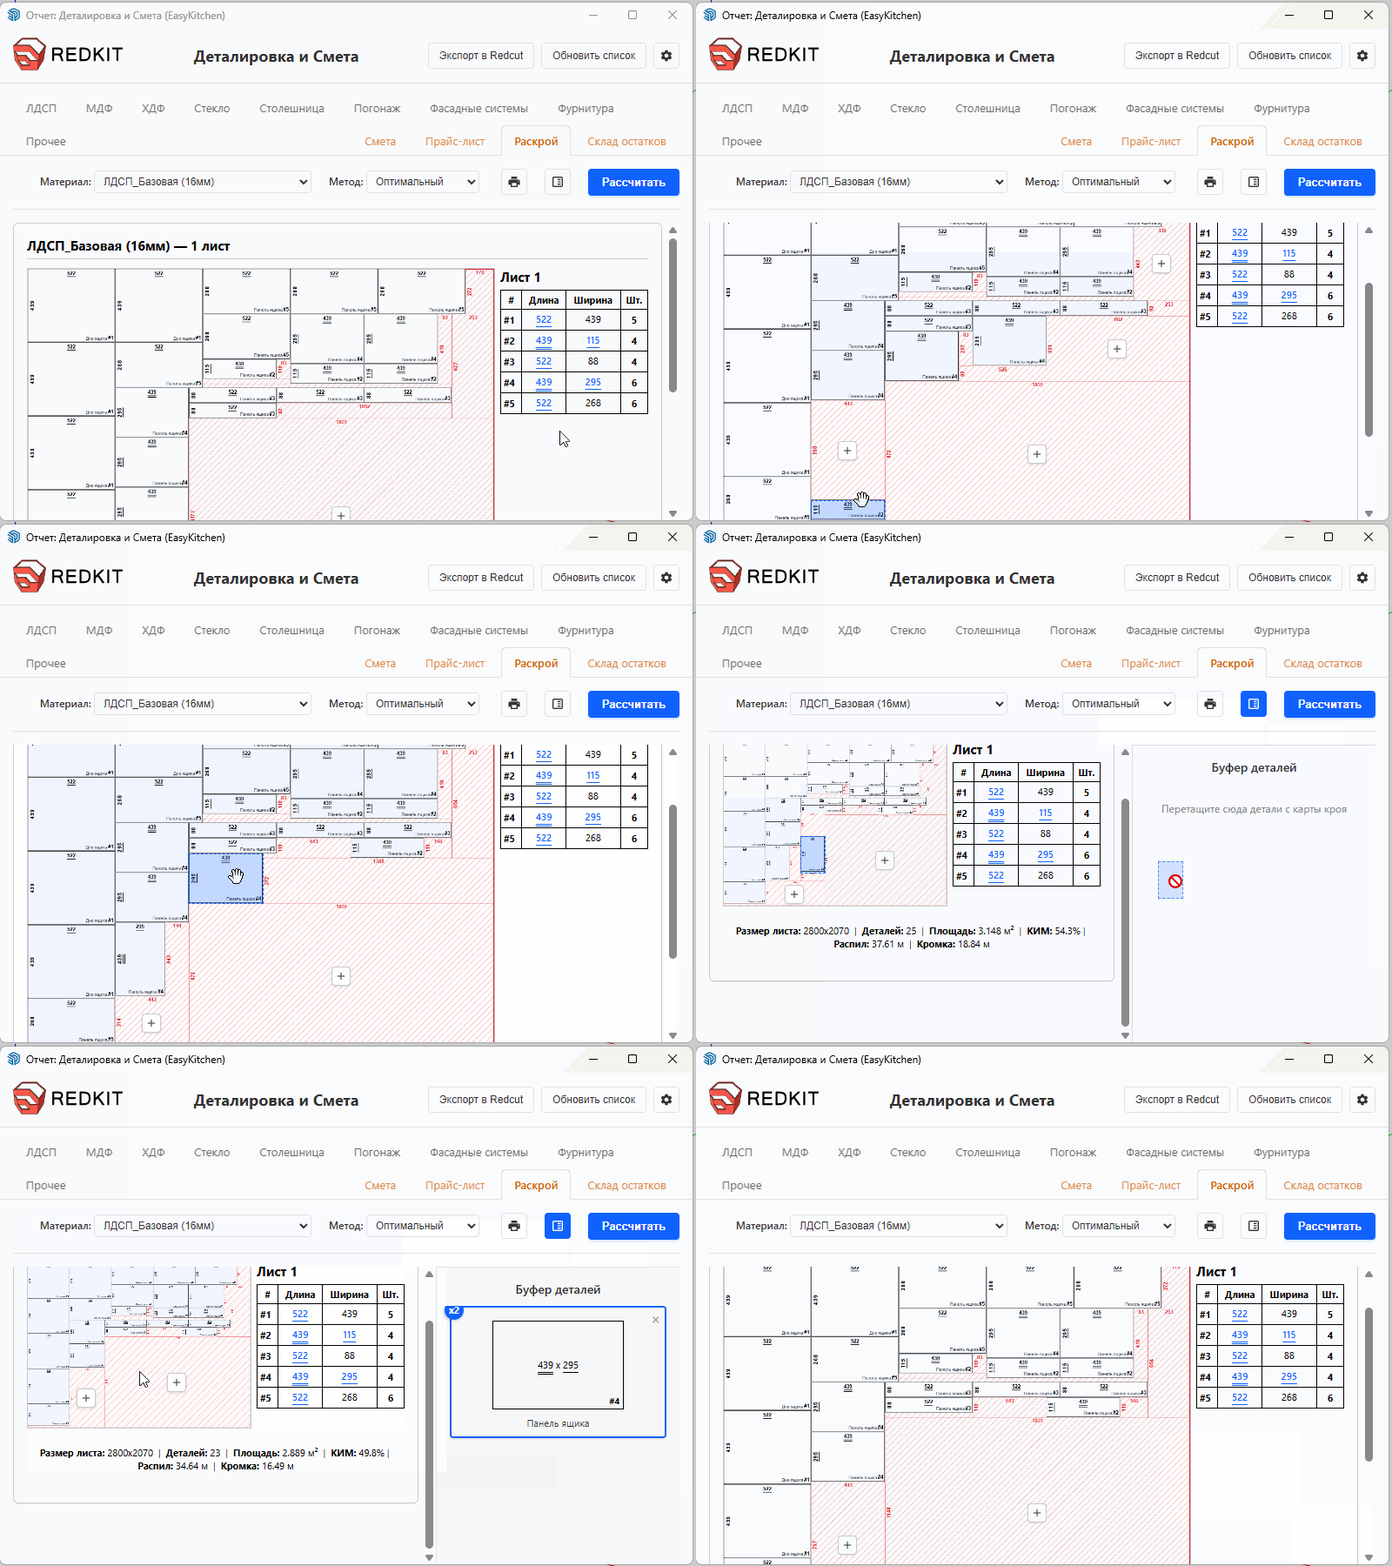
The Cutting Layout includes several interactive features:
-
Move Parts – Simply drag a part with the left mouse button to move it to another position on the sheet.
-
Rotate Parts – While dragging a part, press Shift to rotate it by 90°. The system checks whether rotation is allowed for that part. If rotation is prohibited, a warning is displayed, although you can still force the rotation manually.
-
Parts Buffer – Open the Parts Buffer to temporarily store parts while rearranging the layout. For convenience, identical parts stored in the buffer are automatically grouped together and displayed with their quantity.
-
Part Highlighting – If a sheet contains many parts, simply hover over a part in the list on the right side of the layout. The corresponding part is immediately highlighted on the cutting layout.
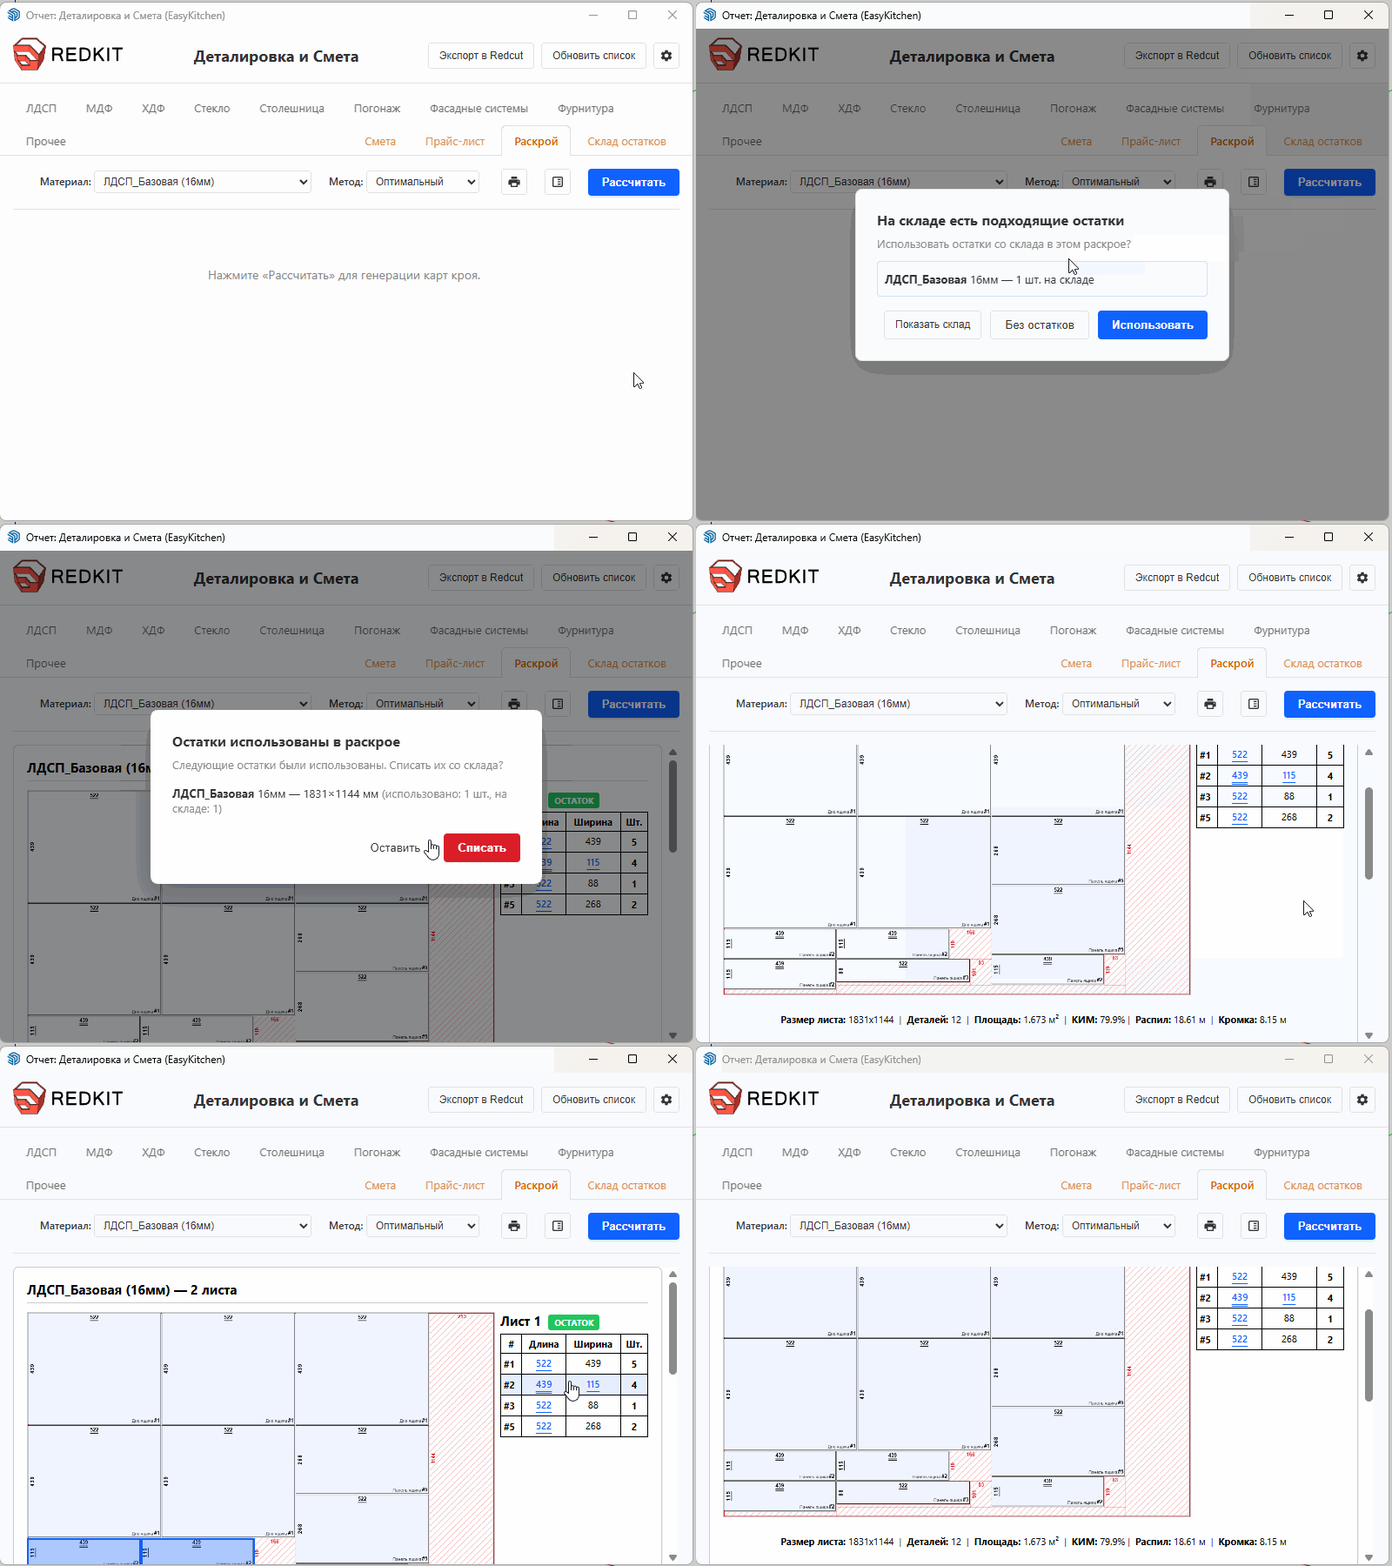
- Saving Remnants – Suitable remnants can be saved to the Remnant Stock for future use. Click the + button on a remnant to open the Add Remnant dialog. There you can adjust the remnant dimensions, quantity, or add notes before saving it. Whenever a future project uses the same material, EasyKitchen will detect the available remnants, offer to use them, and mark layouts created from remnants with a dedicated badge.
Remnant Stock Tab
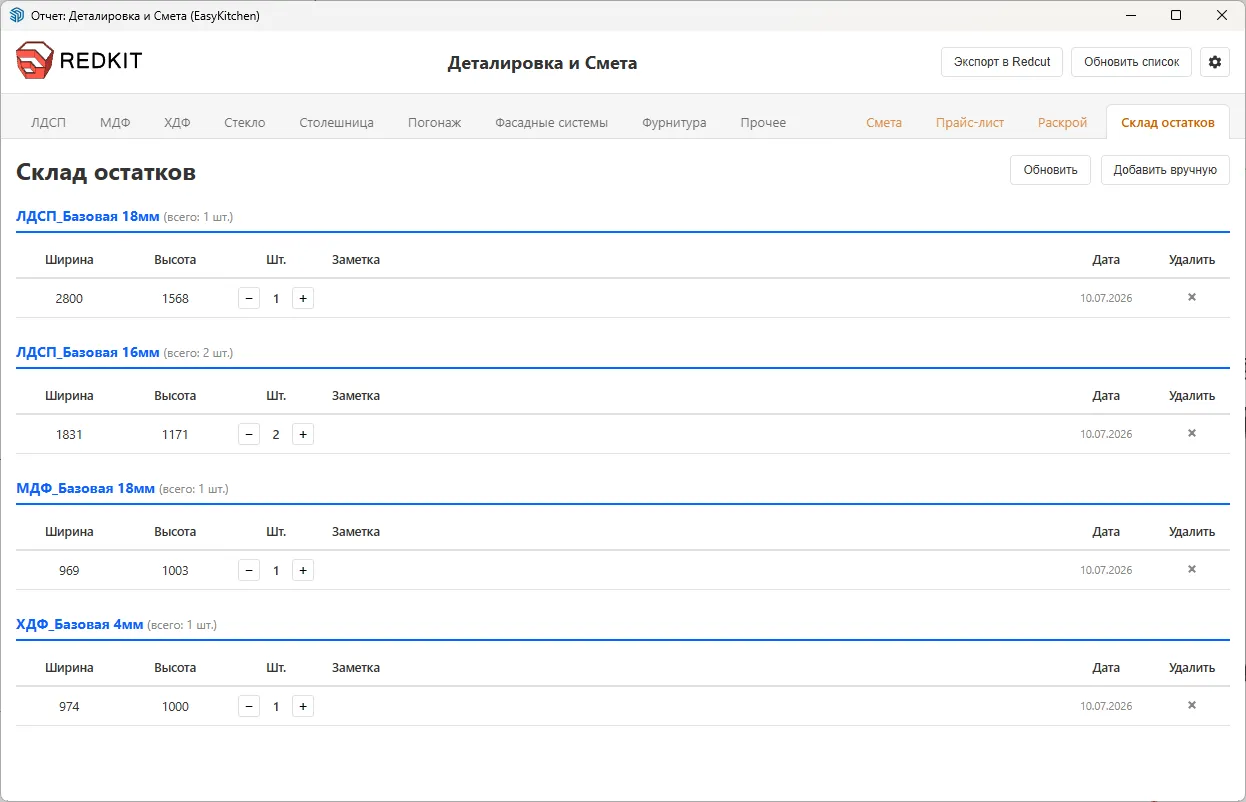
The Remnant Stock stores all remnants that have been added either manually or directly from the Cutting Layout.
Remnants are grouped by material and thickness and can be reused in future cutting layouts.
When generating a cutting layout, if suitable remnants exist in the stock, EasyKitchen will offer to use them.
If you accept, the layout will be generated using the remnant, and the system will offer to deduct it from the stock.
If you decline, a new full sheet will be used instead.
Adding and Removing Remnants
You can manually add a remnant by clicking Add Manually.
A dialog will open where you can specify:
- Material (or enter a custom material name)
- Remnant dimensions
- Quantity
- Additional notes
Remnants can also be added directly from the Cutting Layout by clicking the + button displayed on a suitable remnant.
The system allows you to attach additional information before saving it.
To change the quantity of a stored remnant, use the + or – buttons in the Quantity column.
To permanently remove a remnant from the stock, click the × button at the end of its row. You do not need to use the remnant in a cutting layout before deleting it.
Tool Settings
Several additional buttons are available at the top of the Parts List & Estimate window:
-
Export to Redcut – a legacy compatibility feature for older EasyKitchen workflows. It creates a report file that can be opened in the Redcut Report Processor.
-
Refresh List – recalculates the entire project and regenerates the Parts List, Estimate, and Cutting Layout. Useful after modifying the model or restoring the original calculations.
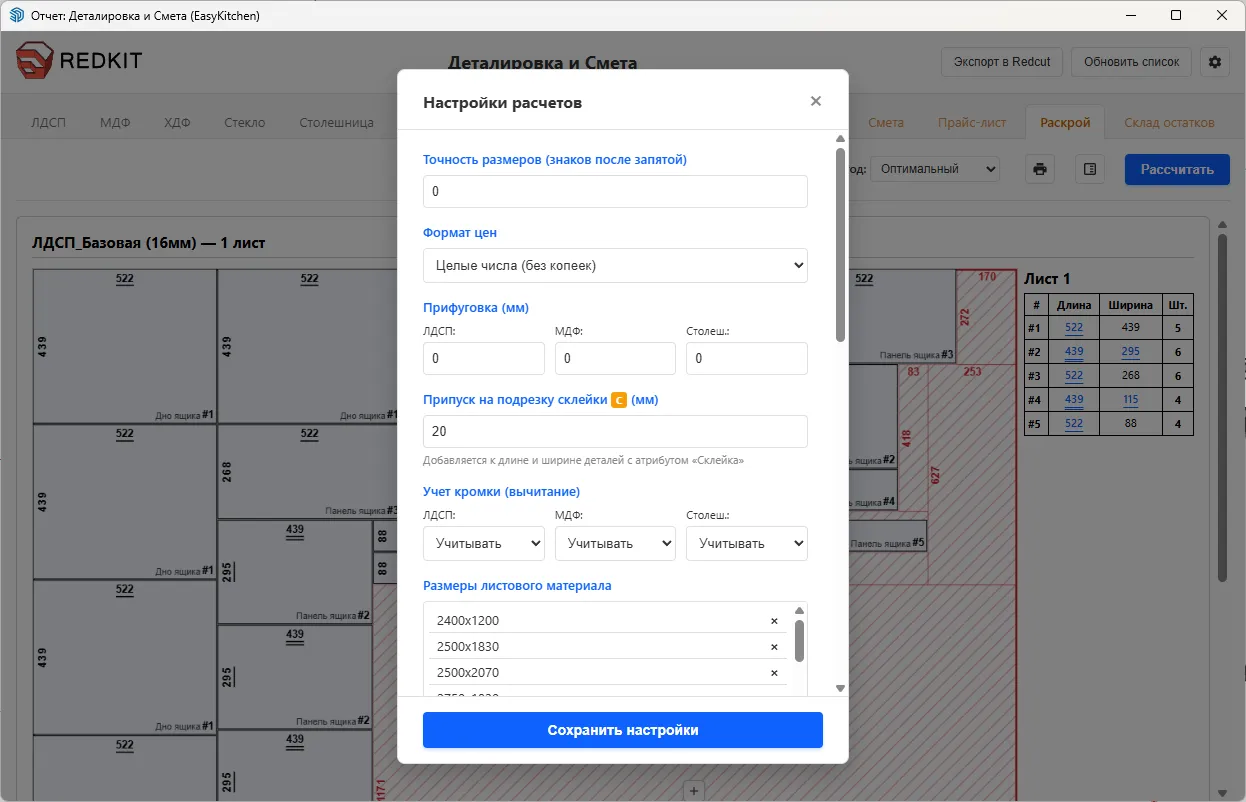
- Settings – opens the complete configuration dialog for the Parts List, Estimate, and Cutting Layout tools.
Settings List
- Dimension Precision (Decimal Places) – by default, this value is set to 0, meaning only whole-number dimensions are used. If you want to work with decimal dimensions, specify the required number of decimal places.
- Price Format – choose how prices should be displayed: as whole numbers (without cents) or with decimal places.
- Jointing Allowance – specify the machining allowance (in millimeters) for chipboard (MFC), MDF, and countertop parts to allow for subsequent precision machining on a jointer, panel saw, or other equipment.
- Glue-Up Trimming Allowance – specify the additional allowance (in millimeters) that will be added to the length and width of parts marked as “Glue-Up”.
- Edge Banding Compensation – choose whether edge banding thickness should be taken into account for chipboard (MFC), MDF, and countertop parts.
- Sheet Sizes – a list of sheet sizes available for use in the Estimate. You can edit this list by adding new sheet sizes or removing existing ones.
- Display and Grouping – select which columns are displayed in the Parts List and which fields affect part grouping. For example, if Part Name is included in the grouping criteria, otherwise identical parts with different names will not be merged into a single entry.
- Export to XLS – choose which columns are exported to the XLS file and specify their order.
- Client Mode – select which estimate columns should be visible when the Estimate is displayed in Client mode.
- Estimate Defaults – specify the default material markup, material waste percentage, and edge banding waste percentage. These values will be applied automatically to new estimates.
-
Cutting Layout Settings:
- Dimensions – display dimensions either in the center of parts or along their edges.
- Saw Kerf – the saw blade thickness. Default: 4 mm.
- Sheet Trimming Margin – the trimming allowance around the sheet perimeter. Default: 10 mm.
- Show Part Names on the Cutting Layout – enable this option to display part names directly on the cutting layouts.
- Minimum Remnant Size – specify the minimum valid remnant length and width (in millimeters). Smaller remnants will not be offered for storage in the Remnant Stock.